Configure Enforcement: Office 365 using MS Graph API
The Microsoft Graph API is used by Fortra Cloud Email Protection to move and delete messages in your employee mailboxes.
TIP: Before you begin, Have your Microsoft Global Administrator available to perform a one time authorization for Fortra Cloud Email Protection.
-
Use the Default Junk Folder as the destination for messages being enforced.
-
Enforce batches of up to 10,000 items.
Follow these steps to use the MS Graph API for enforcement:
- Go to Manage > Organizations.
- Select your organization, and then select the Microsoft API Permissions tab.
- Next to the label Enforcement and Investigation Analysis, click the Enable button.
- Review the requested permissions in the pop-up. To approve, click Enable again. An Office 365 login screen opens.
- Log in with global admin credentials.
-
Review and approve the Microsoft list of permissions.
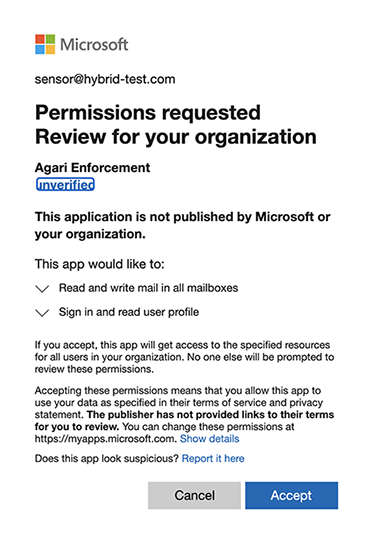
-
If you don't have the required permissions, you are given an error message prompting you to ask an admin to grant you app permissions. Once you have approval, you are returned to the previous page and you see a confirmation message with a green check mark:

-
On the Organization Settings page, find the drop-down menu next to Use API. This setting will now default to MS Graph.. If you are setting up as a new customer, the legacy Outlook 2.0 option will not be available since it was never enabled. If you have enabled it previously, it will appear as a choice in the drop down menu. Leave MS Graph selected.
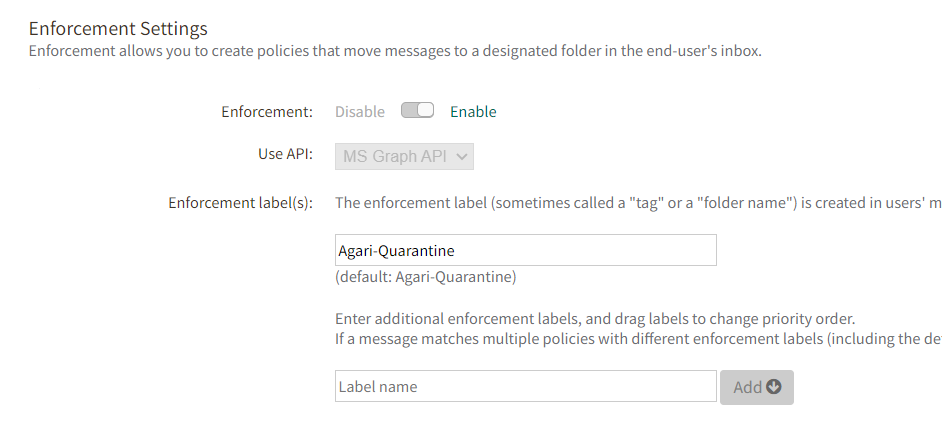
- Click Save.
With MS Graph API now enabled, regardless of the language or spelling of the junk email folder (Junk Mail, Junk E-Mail, Courrier indésirable), you can use this folder as an enforcement destination. You will see Move to default Junk folder as a menu choice.
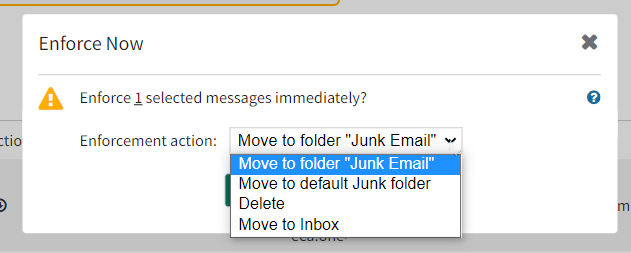
Using the MS Graph API also enables enforcing 10,000 messages in one enforcement action.
Testing the API Enforcement Action with Policies
When enforcement has been enabled, you can begin to create policies with an enforcement action. You can either create an explicitly defined policy, as described in this
To test the enforcement action, begin by creating a policy with a very narrow set of conditions that you are confident will match.
For example, you could create a policy with a From: address of your exact personal (public) email address with a very specific Subject line:
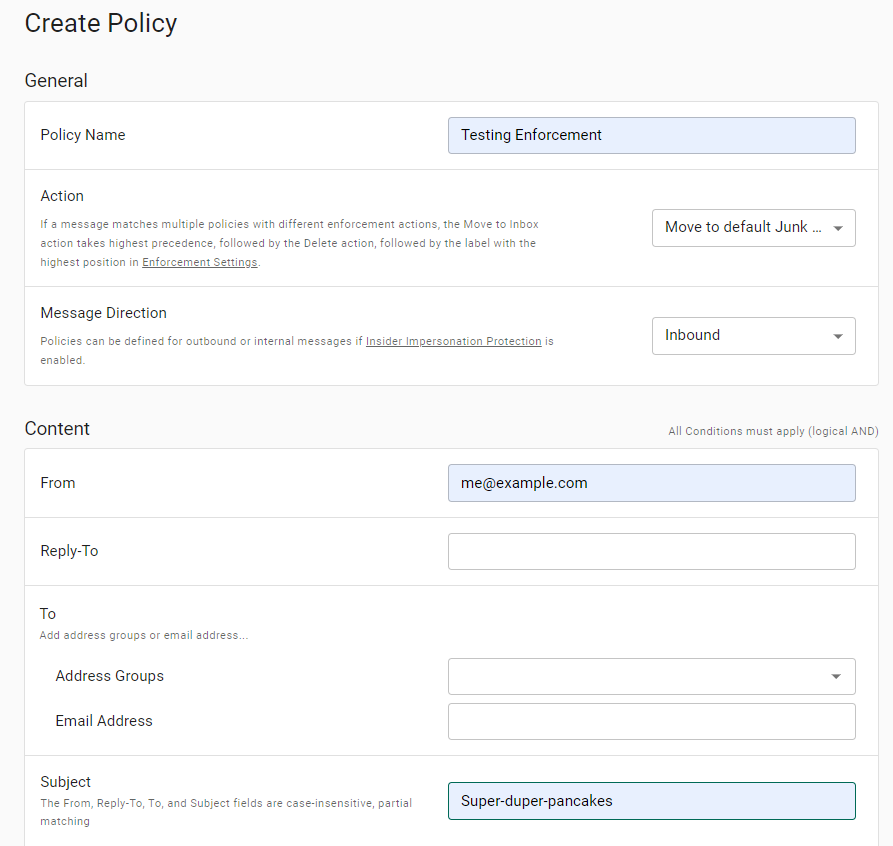
In the Actions section of the policy creation page, specify an Enforcement action:

Save your policy, and then send a test message that will match the conditions in the policy.
You should see that the message (if it not filtered by any other upstream process in your mail stream) will be moved to the folder specified in the Enforcement action.
For example, folders appears in O365 clients like this:
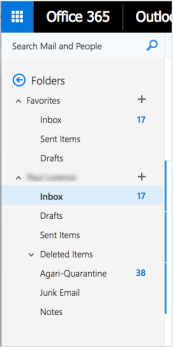
NOTE: Your users may need to refresh their browser in order to see the "Agari-Quarantine" folder immediately after the folder is created.
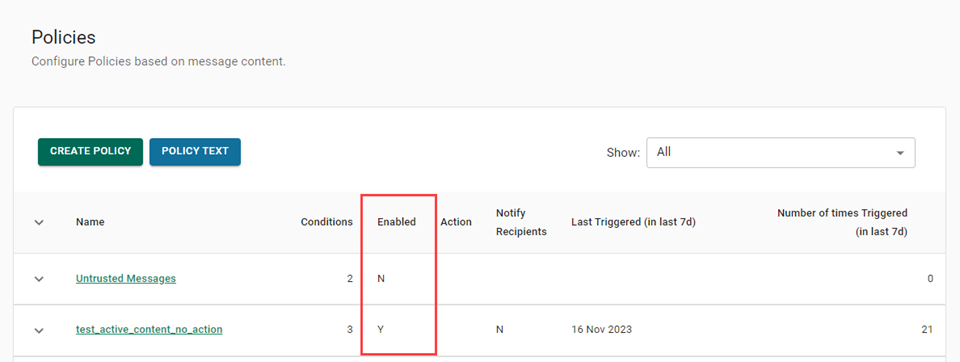
Additionally, note that the Policies page contains a column indicating which policies have an enforcement action:
Managing Enforcement using Microsoft Office 365 Auditing Tools
Enabling Auditing
Office 365 provides extensive auditing of mailboxes and user and administrator actions; however it is not enabled by default.
To enable auditing, follow the steps in this article: https://technet.microsoft.com/en-us/library/jj150552(v=exchg.150).aspx
The key PowerShell command to enable auditing is:
Set-Mailbox <Identity> -AuditEnabled $true
The enforcement action is logged as an "Owner" logon type; a PowerShell command to enable auditing of certain events might look like:
Set-Mailbox <Identity> -AuditOwner MailboxLogin,HardDelete,SoftDelete,Move,MovetoDeletedItems $true
If you have O365 access via PowerShell, you can check the audit actions for a specific mailbox by issuing the command:
Get-mailbox "mailbox_name" | Select-Object -ExpandProperty AuditAdmin
Get-mailbox "mailbox_name" | Select-Object -ExpandProperty AuditDelegate
Get-mailbox "mailbox_name" | Select-Object -ExpandProperty AuditOwner
For example:
PS C:\Windows\system32> Get-mailbox plorence | Select-Object -ExpandProperty AuditOwner
Creating a new session for implicit remoting of "Get-Mailbox" command...
WARNING: Commands available in the newly opened remote session are different than when the im
created. Consider recreating the module using Export-PSSession cmdlet.
Update
Move (<--)
MoveToDeletedItems
SoftDelete
HardDelete
MailboxLogin
Performing an Audit
If individual mailbox auditing has been enabled, you can use Microsoft's PowerShell commands to audit a user's inbox to see if Cloud Email Protection enforced the message.
For example, the Get-MessageTrace command can specifically requests unique MessageTraceID:
PS C:\Windows\system32> Get-MessageTrace -SenderAddress "plorence@gmail.com" -StartDate 06/04/2017 -EndDate 06/06/2017 |
Select-Object Received, SenderAddress, RecipientAddress, Subject, Status, ToIP, FromIP, Size, MessageID, MessageTraceID
Received : 6/5/2017 5:16:09 PM
SenderAddress : plorence@gmail.com
RecipientAddress : plorence@saintmetrics.com
Subject : move this message automatically enforce me
Status : Delivered
ToIP :
FromIP : 209.85.161.180
Size : 11049
MessageId : <CAEKxqn+Qabt8aHg=Pp=pPW2tYyHuO9TO8dJgs09=bp4uv-ndnw@mail.gmail.com>
MessageTraceId : 8d02ca26-1f78-4185-aa07-08d4ac368ef1
Using the MessageTraceID, you can issue a request for trace details:
PS C:\Windows\system32> Get-MessageTraceDetail -MessageTraceId 8d02ca26-1f78-4185-aa07-08d4ac368ef1 -RecipientAddress "p
lorence@saintmetrics.com" -StartDate 06/04/2017 -EndDate 06/06/2017
Date Event Detail
---- ----- ------
6/5/2017 5:16:10 PM Receive Message received by: MWHPR16MB1375
6/5/2017 5:16:12 PM Journal Message was journaled. Journal report was sent to test_stage@stage.enfor...
6/5/2017 5:16:12 PM Journal Message was journaled. Journal report was sent to test_stage@stage.enfor...
6/5/2017 5:16:12 PM Deliver The message was successfully delivered.
6/5/2017 5:16:12 PM Spam Diagnostics
Note how the Trace shows that the message was delivered, but not moved by the Cloud Email Protection API.
However, this command will set up a job to email the search results as an XML attachment to users you specify.
New-MailboxAuditLogSearch - https://technet.microsoft.com/en-us/library/ff522362(v=exchg.160).aspx
Enforcement Action Log Example - PowerShell
You can search the audit log to show the move (enforcement) action Cloud Email Protection took with the API:
PS C:\Windows\system32> Search-MailboxAuditLog -Identity "plorence" -LogonTypes Owner -ShowDetails |select Operation,Fol
derPathName,DestFolderPathName,LogonType,ClientInfoString,LogonUserDisplayName,SourceItemSubjectsList,LastAccessed
Operation : Move
FolderPathName : \Inbox
DestFolderPathName : \Fortra-Quarantine
LogonType : Owner
ClientInfoString : Client=REST;Client=RESTSystem;;
LogonUserDisplayName : Paul Lorence
SourceItemSubjectsList : Thursday enforce me
LastAccessed : 6/8/2017 9:11:10 AM
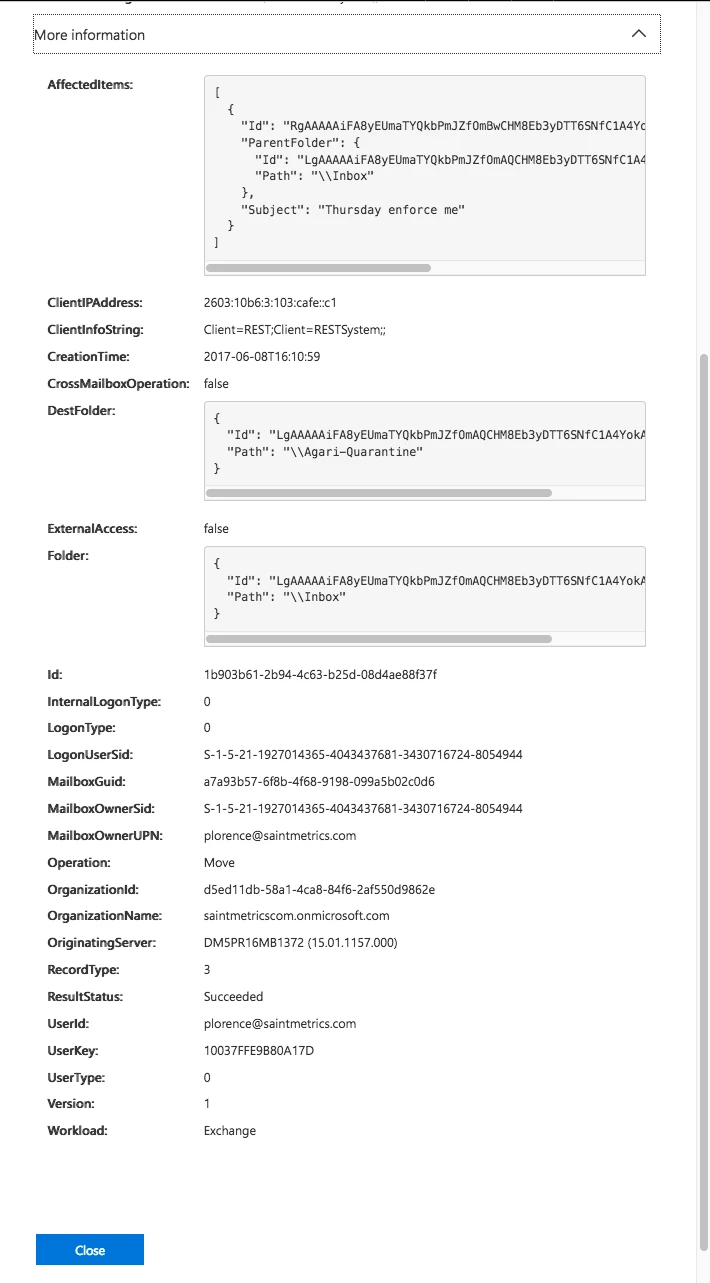
Note how the "Move" operation is requested; the DestinationFolderPathname is "Fortra-Quarantine" (the default), and how the LogonType audit action is "Owner." (Messages which are moved by the API are not considered "Delegate" owner logon actions nor "External Access" audit actions.)
Enforcement Action Log Example - WebUI
This same information auditing information is shown in the "Security and Compliance" WebUI for Exchange Online Protection (EOP) customers.
If auditing is enabled for your Office 365 organization:
- Go to https://protection.office.com and authenticate as an Office 365 administrator.
- Select the Security & Compliance admin center.
- Choose Search & investigation > Audit log search.
- Enter the search parameters.
- View details.
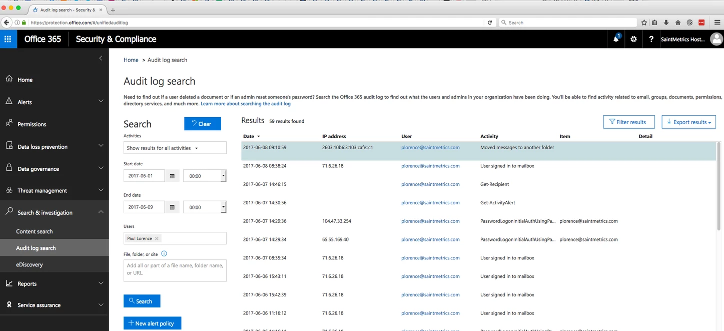
For example, here is the same message viewed in the search results.
Note: "Moved message to another folder" activity:
Drilling in on the details:
Note the Logon Type value is "0" for "Mailbox Owner":
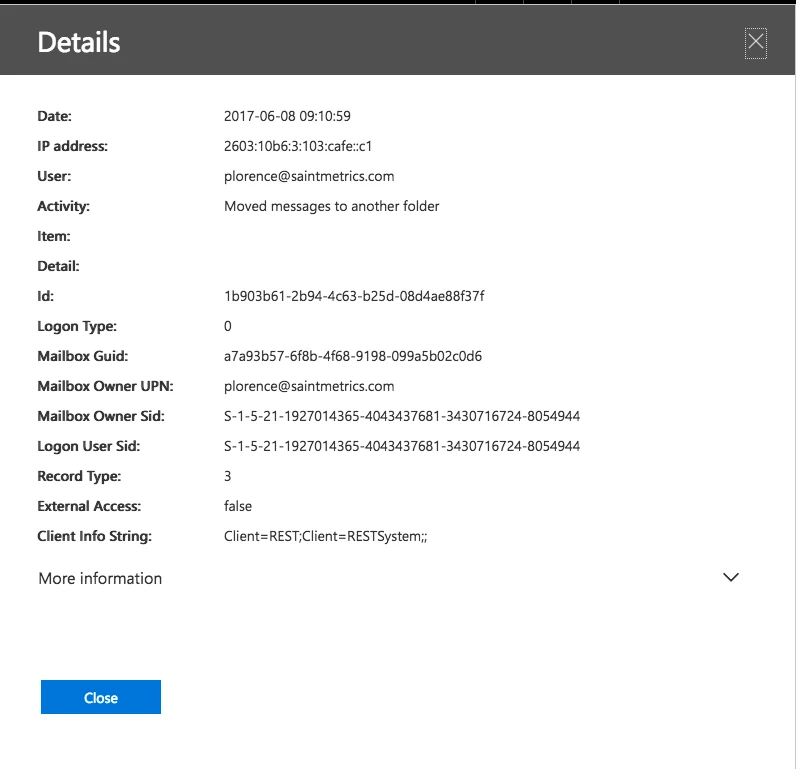
Click More Information for additional details. Note the ClientInfoString and the DestFolder values:
Here are some good references for auditing Office 365 inboxes using PowerShell commands:
http://techgenix.com/using-powershell-simplify-mailbox-auditing-part1/
http://techgenix.com/using-powershell-simplify-mailbox-auditing-part2/
http://techgenix.com/using-powershell-simplify-mailbox-auditing-part3/
Wrapping Up
Among the actions you can take at this point are to view a report on enforcement (see Reporting on API Enforcement) and making sure enforcement is working.
As you create policies with an enforce action, you can expand the conditions to include a wider range of matching emails.
You can also expand who is notified (additional recipients and/or the original recipients).