Configure Enforcement: G Suite
NOTE: Enforcement for G Suite users is available only for organizations with hosted Sensors. See Sensors for more information.
This topic describes how to configure enforcement for Google G Suite.
The general procedure is as follows:
Step 1: Configure a service account for G Suite.
Step 2: Enable enforcement on your sensors.
Step 3: Enable enforcement in the web application.
Step 4: Enable the system notification for enforcement problems.
Step 5: Test the enforcement policy action.
Step 1: Configure a Service Account
This section explains how to configure a service account for G Suite. This involves creating the service account and granting scope to the service account.
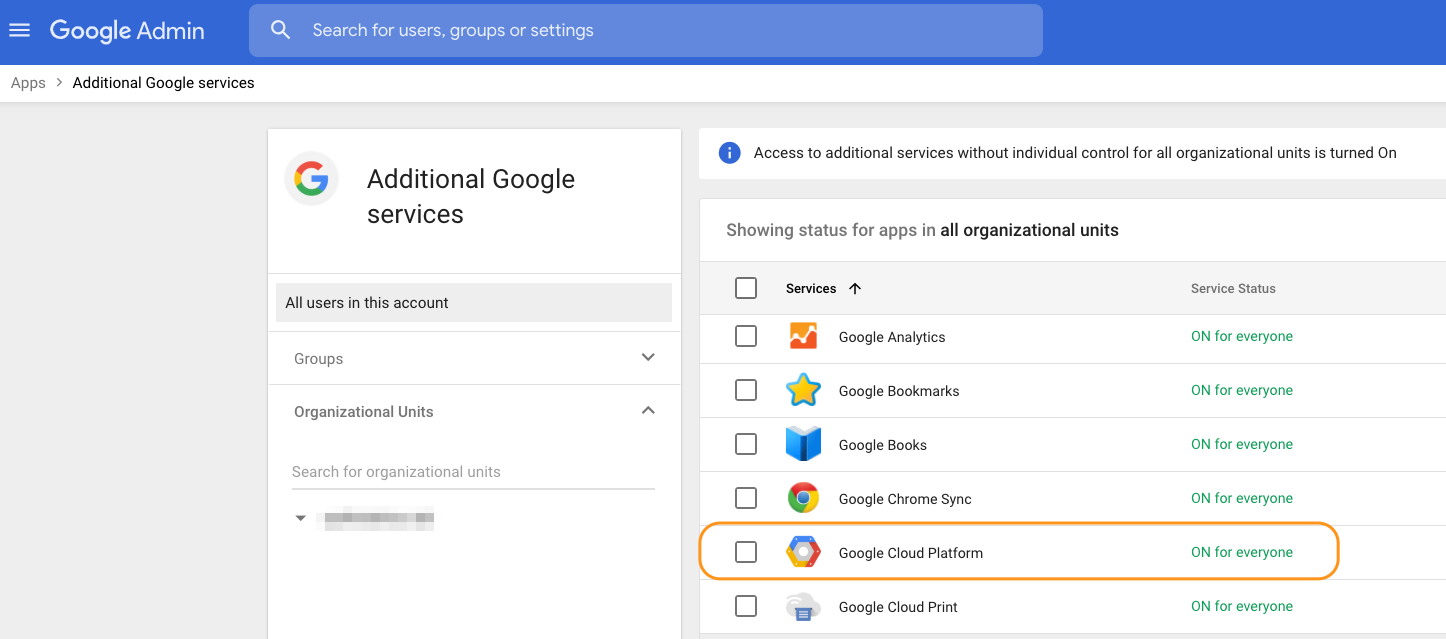
- Ensure that your G Suite account has been enabled in the Google Cloud Platform:
- Go to http://admin.google.com and log in as a user with administrator privileges.
- Click Apps: Manage apps and their settings.
- Click Additional Google Services.
- From the list of additional services, scroll to find Google Cloud Platform (there are multiple pages, so it may be easier to type cloud platform in the search bar).
- Select the Google Cloud Platform check box so that it will be On for everyone.
- Go to the Developers Console at https://console.developers.google.com/ . You will create a project and generate a credentials file for Cloud Email Protection to access your Gmail application.
- API Credentials are associated with "projects." To create a new project, click the Select a project drop-down list, and then in the new window, click New Project.
- Enter Agari Sensor for the Project Name.
- Click Create. It is not necessary to set any advanced options. You may need to wait up to 2 minutes for the project to be created completely.
- Once the project is created, select it from the list (if it doesn't automatically open):
- Enable APIs - if the API library doesn't automatically open, you can access by clicking "ENABLE APIs AND SERVICES" or "Library" - you will be presented with a list of available APIs.
- Search for Service Account.
- Click Identity and Access Management (IAM) API.
- Click Enable.
- Click Credentials.
- Click Create credentials > Service account key.
- In the Service account drop-down list, select New service account.
- Enter or select the following settings:
- Service Account Name: Agari Sensor
- Select a Role: Service Accounts > Service Account Token Creator and Service Account User
- Service Account ID: will be automatically populated.
- Key Type: JSON
- Click Create.
- Save the .json file.
- Click Close.
- Click Manage service accounts.
- Click Edit.
- Select the Enable G Suite Domain-wide Delegation check box.
- In the Product name for consent screen field, enter Agari Sensor.
- Click Save.
- The project associated with the credentials must be activated to use the Gmail API. Click the Google APIs link in the top menu.
- Click Library.
- Search for Gmail and select Gmail API.
- Click Enable.
- Click Library.
- Search for Admin SDK and select Admin SDK.
- Click Enable.


NOTE: Save this file to a secure location, and do not lose this file. The credentials contained in this file grant limited access to all of the inboxes in your organization. You will use these credentials in the next section to grant access to the sensor(s).
The service account is now configured to be used with the Gmail API and Admin SDK API.
Grant Scopes to the Service Account
Now you must grant access scopes (specific for Gmail) to the service account you created in Create the Service Account.
- Go to the Administrator console at http://admin.google.com and, if necessary, log in as a user with administrator privileges.
- Go to Apps.
- Search for security and select the Security app shown here:
- Click API reference.
- Select the Enable API Access check box.
- Click Advanced settings.
- Click Manage API client access.
- In the Client Name field, enter the Client ID of the service account created in Create the Service Account. You can find this ID in two places:
- In the .json file that you downloaded, it will appear on a line by itself. In this example, the client_id is on line 7:
- In the developers console at https://console.developers.google.com/, click Credentials. The Client ID is listed there:


Copy the Client ID (not including the quotations) and paste it into the Client Name field
- In the One or More API Scopes field, enter the following strings exactly as below, with no changes or extra information in the field. You can simply copy and paste the entire string in the field - it will appear wrapped across multiple lines in this document, but will paste as a single line:
- Click Authorize.

https://mail.google.com/, https://www.googleapis.com/auth/gmail.labels, https://www.googleapis.com/auth/gmail.modify, https://www.googleapis.com/auth/gmail.readonly, https://www.googleapis.com/auth/admin.directory.user.readonly
Make sure that if you copy the entire string of URLs and you paste the string of URLs into the field, that no spaces are added within the URLs themselves.
A row will appear indicating that permissions have now been granted to the supplied Client ID
Step 2: Enable Enforcement on Your Sensor(s)
Using the JSON credentials you downloaded in Create the Service Account, you can now enable enforcement on each of your sensors. You can accomplish this within Cloud Email Protection or using the command-line interface for each sensor.
Enable Enforcement on a Sensor in Cloud Email Protection
TIP: Prerequisite: The JSON file you downloaded in Create the Service Account.
- Go to Manage > Sensors.
- If you have more than one sensor, select the appropriate tab for the sensor.
- Click Enable API Enforcement.
- Copy the entire contents of the JSON service credentials file and paste those contents into the Service account credentials field.
- Enter a Test administrator email address. You must provide a test email address that is an actual known good inbox in your G Suite environment; this test address is used to test that Cloud Email Protection can successfully authenticate and use the API to see and access the mailboxes in your environment.
- Click Test and Enable API Enforcement.
NOTE: No test email is sent during this enablement step.
A success message appears informing you that the permissions were granted successfully from the G Suite service account:
NOTE: This process only provides the ability for Cloud Email Protection to be able to enforce messages via the API. Enforcement will not yet be enabled. You will still need to enable enforcement at the organizational level within Cloud Email Protection and then configure policies to use an enforcement action before any messages are to be moved from users' inboxes.
Step 3: Enable Enforcement for Your Organization
Once you have enabled enforcement on at least one sensor, you will be able to configure enforcement for your organization in the web application.
- Go to Manage > Organizations.
- Click the name of the organization.
- In the Enforcement Settings section, set the Enforcement switch to Enable.
- Enter an Enforcement Label. The enforcement label is the "tag" or "folder name" that will be added to messages that are enforced; effectively the message will be moved to this folder name, and it will be the name of the folder users see in their email client.
- Click Save.
Step 4: Enable the Enforcement-related System Notification
When enforcement is enabled for your organization, an additional system notification is available to alert you to when the credentials the sensor uses for enforcement are broken.
- Go to Manage > System Notification.
- Click Configure.
- Select the The credentials supplied for... check box.
- Click Save.
Step 5: Test the Enforcement Actions with Policies
When enforcement has been enabled on each sensor and globally for the organization, you can begin to create policies with an enforcement action.
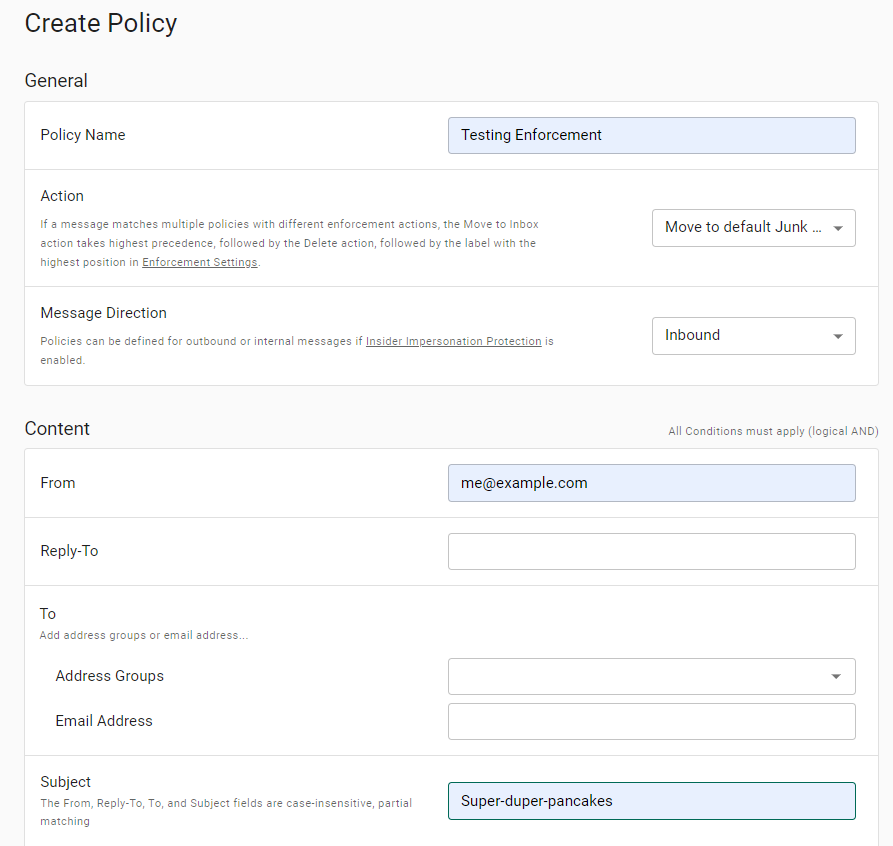
To test the enforcement action, begin by creating a policy with a very narrow set of conditions that you are confident will match.
For example, you could create a policy with a From: address of your exact personal (public) email address with a very specific Subject line:

In the Actions section of the policy creation page, specify an Enforcement action:

Save your policy, and then send a test message that will match the conditions in the policy.
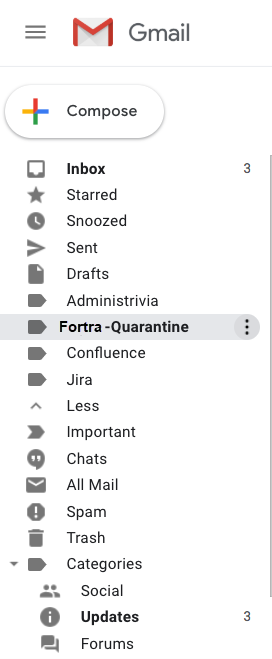
You should see that the message (if it not filtered by any other upstream process in your mail stream) will be moved to the folder specified in the Enforcement action.
For example, folders appears in Gmail clients like this:

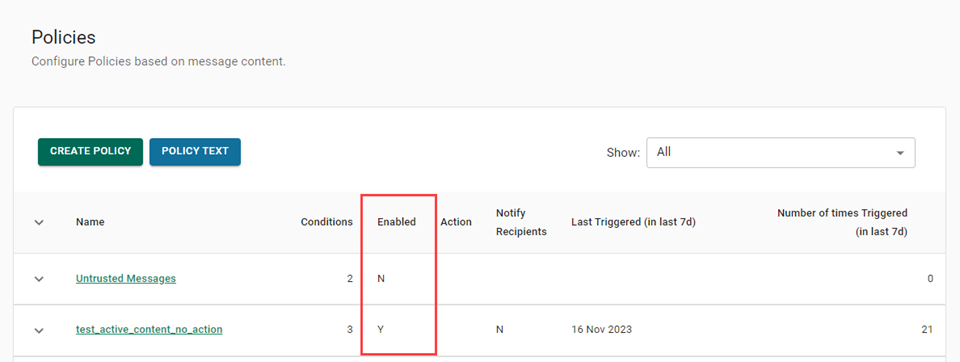
Additionally, note that the Policies page contains a column indicating which policies have an enforcement action:

Wrapping Up
Among the actions you can take at this point are to view a report on enforcement (see Reporting on API Enforcement) and making sure enforcement is working on a Sensor (see Enforcement Sensor Status).
As you create policies with an enforcement action, you can expand the conditions to include a wider range of matching emails.
You can also expand who is notified (additional recipients and the original recipients).