Sensor Configuration and Operation
This
The sensor in the OVA is preconfigured with basic settings that allow it to boot and become available on the network without additional configuration. This includes being assigned an IP address upon startup via DHCP. Sensor configuration is performed with a character-based menu. You can:
- Start, auto-start, reboot, and stop the sensor
- Set a static IP address or enable DHCP
- Set a proxy
Sensor configuration is performed from the sensor management menu on the virtual machine:
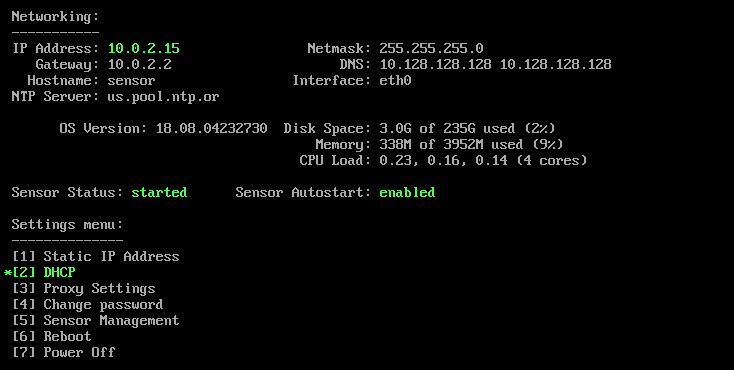
All sensor management assumes that you're starting from here.
Start the Sensor
You can start a Sensor only when it is stopped.
- Press 5 (Sensor Management).
- Press 1 (Start Sensor).
- Press y.
- Press 3 (Main Menu). (The Sensor management app will return to the main menu automatically after several seconds if you do nothing and will not save your action.)
TIP: You can also start the Sensor from the command line when you ssh into the virtual machine. See the Admin account commands section for details.
Stop the Sensor
You can stop a Sensor only while it is running.
- Press 5 (Sensor Management).
- Press 1 (Stop Sensor).
- Press y.
- Press 3 (Main Menu). (The Sensor management app will return to the main menu automatically after several seconds if you do nothing and will not save your action.)
TIP: You can also stop the Sensor from the command line when you ssh into the virtual machine. See the Admin account commands section for details.
Reboot the virtual machine
- Press 6 (Reboot).
- Press y.
Boot into safe mode
When booting the virtual machine, for troubleshooting purposes, you can boot directly into safe mode or have a boot menu displayed from which you can choose from normal or safe mode.
- On boot, before the boot screen appears:
- Hold down the S key to boot into safe mode. (Safe mode does not restore custom settings on boot.)
- Hold down any key other than D or S to display a boot menu.
Power down the virtual machine
- Press 7 (Power Off).
- Press y.
The Sensor is stopped and the virtual machine closes down.
Enable Sensor auto-start
Enabling Sensor auto-start means that the Sensor starts up automatically when the virtual machine starts, and enabled is the default setting for a Sensor when it is initialized. You can enable Sensor auto-start only when it is disabled.
- Press 5 (Sensor Management).
- Press 2 (Enable Autostart on Reboot).
- Press y.
- Press 3 (Main Menu). (The Sensor management app will return to the main menu automatically after several seconds if you do nothing and will not save your action.)
TIP: You can also enable auto-start of the Sensor from the command line when you ssh into the virtual machine. See the Admin account commands section for details.
Disable Sensor auto-start
Disabling Sensor auto-start means that the Sensor does not start up automatically when the virtual machine starts. You can disable Sensor auto-start only when it is enabled.
- Press 5 (Sensor Management).
- Press 2 (Disable Autostart on Reboot).
- Press y.
- Press 3 (Main Menu). (The Sensor management app will return to the main menu automatically after several seconds if you do nothing and will not save your action.)
TIP: You can also disable auto-start of the Sensor from the command line when you ssh into the virtual machine. See the Admin account commands section for details.
Enable DHCP
NOTE: You should enable DHCP only if you have configured a DHCP reservation to permanently lease a static IP address for the Sensor in your DHCP server.
Enabling DHCP means that the IP address and other network configuration parameters are set dynamically. When you enable DHCP, you will set the hostname and NTP server.
- Press 2 (DHCP).
- Enter a value for hostname and press Enter (just press Enter to keep the current value).
- Enter a value for NTP server and press Enter (just press Enter to keep the current value).
Your screen should look something like this:
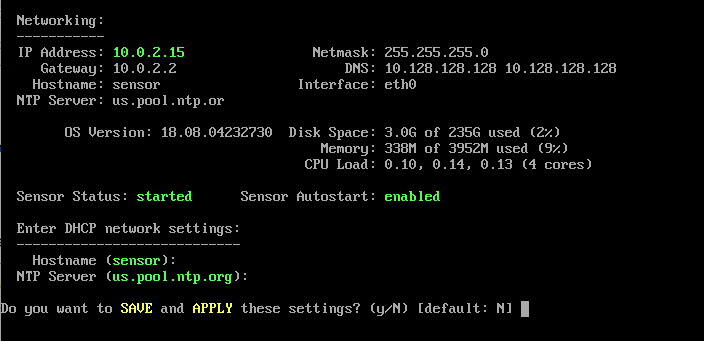
- Press y.
Setting a static IP address means that you also define the other network parameters necessary for the Sensor to connect. Typically, you will want to set a static IP address and define the network parameters to that they work within your own network infrastructure.
NOTE: If you installed the Sensor in an environment without DHCP, no default values were assigned. In that case, there are no “current values” and you will have to enter specific and valid values for each parameter.
- Press 1 (Static IP Address)
- Enter a value for hostname and press Enter (just press Enter to keep the current value).
- Enter a value for NTP server and press Enter (just press Enter to keep the current value).
- Enter a valid IP address and press Enter (just press Enter to keep the current value).
- Enter a valid netmask value and press Enter (just press Enter to keep the current value).
- Enter a valid gateway value and press Enter (just press Enter to keep the current value).
- Enter a valid DNS value (DNS 1 will typically be your internal DNS server, if any) and press Enter (just press Enter to keep the current value).
- Enter a second valid DNS value (DNS 2 will often be an external, fallback DNS server to be used when DNS 1 in unavailable) and press Enter (just press Enter to keep the current value).
Your screen should look something like this:
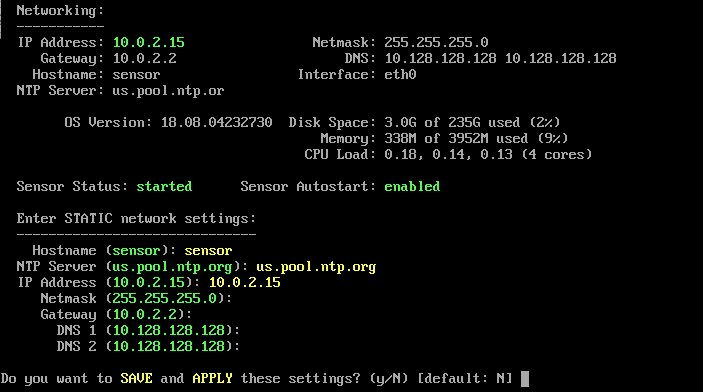
- Press y.
Set a proxy
If your organization uses a proxy server to connect to the internet, you can configure the Sensor to use that proxy.
- Press 3 (Proxy Settings).
- Press y if the proxy server uses NTLM authentication or n (default) if it does not.
- Enter the connection string for your proxy server and press Enter. The connection string includes protocol, server, port, and optionally (if the server does not require authentication) username and password. The protocol can be either http or https (recommended). For example:
- https://username:password@server:port
- http://server:port
Your screen should look something like this:
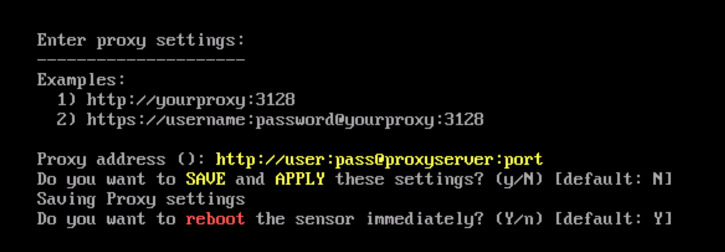
- Press y to save your settings.
- Press y to reboot the virtual machine.
Disable a proxy
This option is available only when a proxy has been set.
- Press 3 (Proxy Settings).
- When asked if you want to disable the proxy, press y.
Admin account commands
If you ssh into the virtual machine instead of using the Sensor management menu, you can use the following commands for Sensor management:
- first-time-setup - run Sensor setup
- sensor-start - start the Sensor, once set up
- sensor-stop - stop the Sensor, once set up and started
- sensor-service-enable - enable auto-start of Sensor on boot
- sensor-service-disable - disable auto-start of Sensor on boot
Enable a second network interface
- Connect to the virtual machine as admin.
- In the home directory, edit the eth1.conf file as follows:
- DHCP: Uncomment interface in ipv4 or ipv6 as needed
- Static IP: Uncomment interface, ip, and subnet as needed
- Reboot the virtual machine.