Configure Dual Delivery: Symantec Brightmail
This
The general procedure is as follows:
Step 1: Create a placeholder SMTP Domain to represent outgoing dual delivery messages.
Step 2: Create a content filter that blind-carbon copies (bcc:) all email to the sensor.
Step 3: Modify your spam policies to prevent spam from being delivered to the sensor.
Step 4: Test the filter, and check your delivery message queue to confirm that messages are delivered to the sensor.
Step 5: Confirm that any desired system alerts are in place to inform administrators of any problems.
NOTE: Your email environment may deviate from some of the defaults in the examples shown. These instructions assume a single Scanner/Control Center SMG/Brightmail instance. If you have a more complex system, you may need to modify or extend the steps outlined below. The goal of these configuration changes is to route a copy of all messages passing the anti-spam filters to the sensor(s). These instructions apply to Symantec Messaging Gateway (SMG)/Brightmail version 10.5.4-4.
Step 1: Create an Artificial SMTP Domain
The first step is to create a placeholder SMTP domain that can be used for the dual delivery stream of outgoing messages. This is not a real domain, but a symbolic domain that the SMG/Brightmail system will use to route the messages.
- In the Symantec Messaging Gateway Control Center, click the Protocols tab.
- Click Domains.
- Click Add.
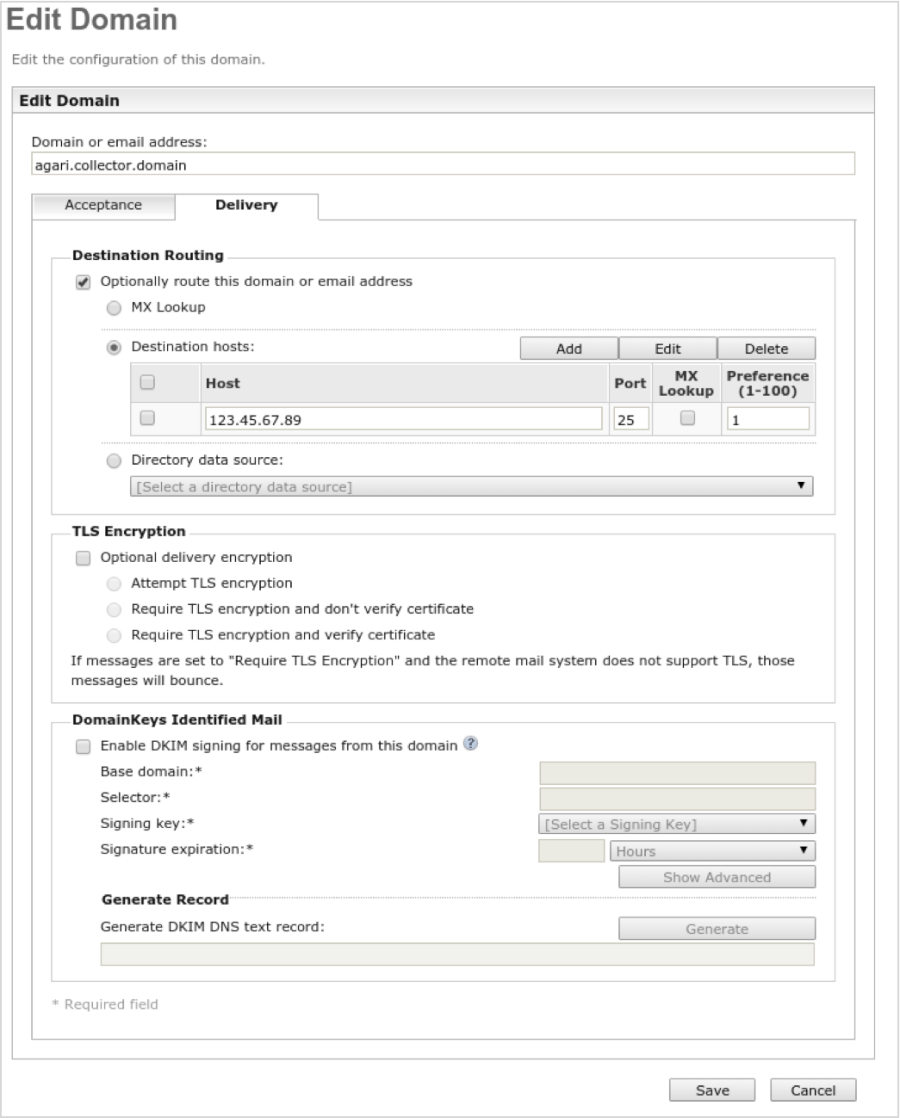
- In the "Domain or email address:" field, enter an artificial domain name. For example: "yourcompany.collector.domain".
- Deselect the Local domain check box (you will not be accepting inbound mail to this artificial domain).
- Click the Delivery tab.
- Select the Optionally route this domain or email address check box.
- Select the Destination hosts radio button.
- Click Add to add a new host.
- On the new host line, enter the IP address of the Sensor ("123.45.67.89" in the example below). This page also allows you configure the TLS settings for delivery to the host, if desired. You can also configure multiple host rows for load balancing. For example:
- Click Save to establish the new domain.
- Confirm that your new domain is listed in the list of domains under the Protocols tab.

Step 2: Create a Content Filter
The next step is to create a content filter that will be used for sending the duplicate message stream.
- In the Symantec Messaging Gateway Control Center, click the Content tab.
- Click Add.
- Keep the default Policy Template selection of Blank, and click Select.
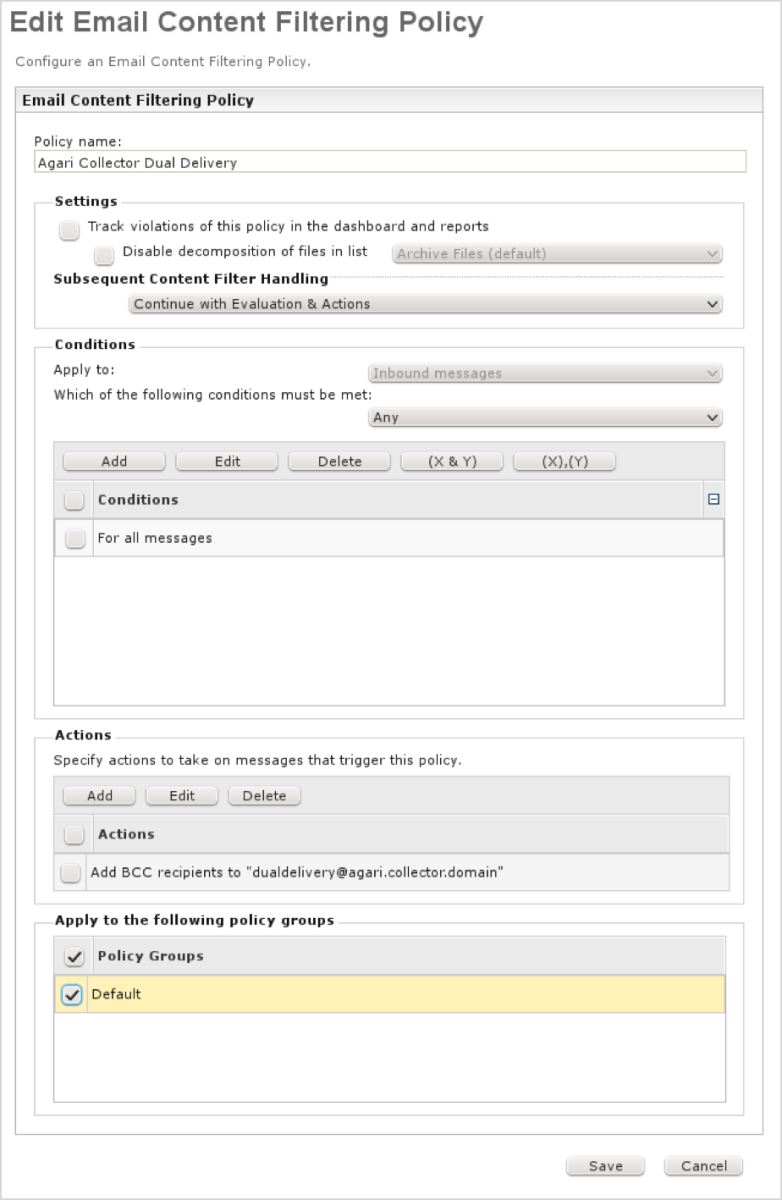
- In the Policy name field, enter a descriptive name, such as "Sensor Dual Delivery."
- Deselect the Track violations of this policy in the dashboard and reports check box.
- Ensure that Subsequent Content Filter Handling remains at the default value of Continue with Evaluation & Actions, otherwise you may risk stopping delivery of your email to your users.
- In the Conditions section, in the Apply to drop-down list, select Inbound messages.
- In the Conditions section, click Add to create a new condition.
- Select For all messages.
- Click Add Condition.
- In the Actions section, click Add to create a new action.
- In the Configure An Action drop-down list, select Add BCC recipients.
- In the BCC recipients field, enter a fictional address at the artificial domain you specified in Step 1: Create an Artificial SMTP Domain. The domain must match exactly. For example: "dualdelivery@yourcompany.collector.domain".
- Click Add Action.
- Select the checkbox for the "Default" Policy Group, as well as any other policy groups that are appropriate for your organization. The resulting screen should look similar to the following:
- Click Save.

The new filter appears in the list of filters, and it should look similar to the following:

Now that your content filter is in place, mail will begin to flow to the sensor, but you have not yet modified your spam policies to prevent spam from being sent to the sensor. This is not a problem in the short term, but be sure to modify your spam policies as directed in the next section, Step 3: Modify your Spam Policies. Otherwise you will be delivering a large volume of spam email to the sensor for no reason.
If you are concerned about the resource usage in such a scenario, you could disable the content filter temporarily until you establish the spam policy, and then re-enable the content filter.
Step 3: Modify your Spam Policies
The sensor requires copies of only those email messages which make it through all of the content and anti-spam filters, and so we recommend completing the next steps to save resources on your gateway and your networks. The following steps describe as straightforward approach toward not sending spam to the sensor. You may need to alter the instructions according to the specific policies of your organization and your existing configuration.
- In the Symantec Messaging Gateway Control Center, click the Spam tab.
- Click Add to add a new Spam Policy.
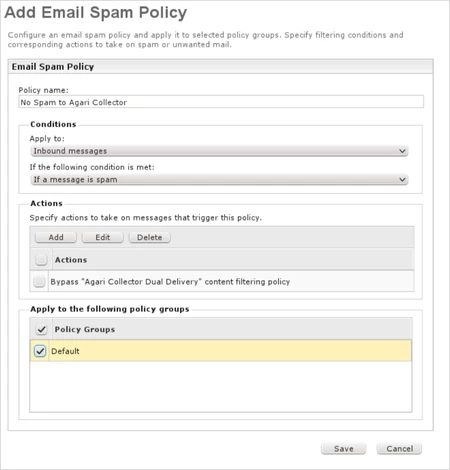
- In the Policy name field, enter a descriptive name. For example: "No Spam to the Sensor."
- In the Apply to drop-down list, select Inbound messages.
- In the If the following condition is met drop-down list, select If a message is spam.
- In the Actions section, click Add.
- In the Configure An Action drop-down list, select Bypass content filtering.
- In the Content filtering policy drop-down list, select the content filter that you created in Step 2: Create a Content Filter.
- Click Add Action.
- In the Apply to the following policy groups section, select all the policy groups to apply the policy to. (You should choose all the policy groups that your content filter was applied to in Step 2: Create a Content Filter.) Your completed Email Spam Policy page will look similar to the following:
- Click Save.
TIP: Your organization may already be prepending "[Spam]" to Subject lines, blocking spam, quarantining spam, or taking other actions on mail which is positively identified as spam.

The policy will appear at the bottom of the list of spam policies.
Step 4: Test the Filter by Checking the Delivery Queue
At this point, non-spam messages should be flowing to the sensor, but the results may not be immediately visible in the dashboard.
To confirm that the filter is functioning properly:
- In the Symantec Messaging Gateway Control Center, click the Status tab.
- Select Message Queues. The default values for "Host", "Queue", and "Route" are: "Local Host", "Delivery", and "All", respectively, which may suffice for your architecture, or may need adjustment in some cases. (For example, you may need to change the value of List, which defaults to "25 in queue longest," and which may mean you only see old messages instead of recent issues.)
- Click Display Filtered, and any messages that were unable to be delivered properly to the sensor should appear (and potentially among other, unrelated messages.) You can investigate any undeliverable messages to troubleshoot deliverability issues.
Step 5: Confirm That Administrative Alerts Are in Place
Your system should handle a temporary connectivity problem with the sensor without generating bounces to either the original senders or to an address in your own system. But a connectivity issue would still cause messages bound for the sensor to be queued. If a short connectivity outage is anticipated, the queuing may not be a problem. In the event of a longer connectivity outage, you may need to disable the content filter that sends the copies to the sensor.
It is recommended that you confirm that your system is configured to alert you when SMTP queues are getting too large.
- In the Symantec Messaging Gateway Control Center, click the Administration tab.
- Go to Settings > Alerts.
- Click the Queues tab to specify an address to receive alerts as desired.