Configure Dual Delivery: Proofpoint
This topic describes how to configure dual delivery from Proofpoint environments to the Fortra Cloud Email Protection sensor.
The general procedure is as follows, but please note that there are a few exceptions based on whether or not your Proofpoint MTA is a “perimeter” MTA:
Step 1: Create an SMTP sending profile that specifies a route for email to the sensor.
Step 2: Create a spam detection rule that directs Proofpoint to send a copy of non-spam messages using the SMTP profile.
Step 3: Enable SPF detection.
Step 4: Configure TLS encryption, if desired.
Step 5: Confirm that any desired system alerts are in place to inform administrators of any problems.
Step 6: Add the X-Agari-Authentication-Results header (only for a perimeter gateway).
Important Consideration Regarding the "Authentication-Results" Header
The sensor depends on the presence of an accurate, uncorrupted Authentication-Results header to help evaluate a sending identity. Typically, the "perimeter" MTA for your enterprise (meaning, the first point of entry into your enterprise from the sending MTAs on the internet) will evaluate the incoming messages and add an Authentication-Results header, and any downstream MTAs in your institution will be carefully configured to preserve the integrity of this header (they must not overwrite it with their own header unless they are able to do so with accurate information, and they must not strip the header from the message).
However, mail routing environments can be complex, and it's not always practical to ensure integrity of the header for every downstream MTA. To simplify the situation, sensors will first look for a duplicate of the header called X-Agari-Authentication-Results. If they find none, they will fall back to the Authentication-Results header.
This allows you to configure your perimeter MTA to create (or duplicate) the Authentication-Results header under an alternate name: it will stand a greater chance of making it through your various downstream MTAs without being corrupted.
Step 1: Create an SMTP Profile
Create an SMTP sending profile used for sending the duplicate message stream.
- Go to System > Settings > SMTP.
- Click Add Profile. The exact details to use in this profile will vary depending on your infrastructure.
- Enter the profile ID. For example: “agari-dual.”
- Enter a Description. Use something instructive, such as “SMTP profile to send to the sensor.”
- Enter one or more IP addresses or hostnames in the Host field, separated by commas, with no spaces in-between (such as 123.123.45.67,123.123.45.67,backup-sensor.otherdomain.com), each one what is assigned to an instance of a sensor.
- For Delivery Type, select:
- Load Balanced (default) if you have a single sensor or if you have multiple sensors and you want the sensor loads managed automatically
- Ordered if you have multiple sensors and would prefer that the first listed in the Host field be used as the main sensor and all others to be used in case of failure”
- Leave the Port as 25 unless you know your sensor has been configured to listen on a port other than 25.
- Timeout can be left blank or configured as you see fit: you may want to set a relatively quick timeout, so that in the event of a loss of connectivity to the Sensor, your Proofpoint system does not spend much time attempting to deliver.
- Set the From Address to something such as “proofpoint-pps@yourdomain.com” -- it’s not actually relevant in this application. (Recent versions of Proofpoint also have a “Display Name” field -- this can be left blank.)
- Set the HELO domain to the mail domain of your company, for example, “yourdomain.com” (this is not important).
- In SMTP Address, select Use Original Recipient Address
- The Login/Password fields can be left blank (they will be populated with asterisks if you edit the SMTP profile later).
- (Optional) Click Test SMTP Connection to ensure connectivity to the sensor.
- Click Save Changes and wait for your Proofpoint system to update.
Your SMTP profile might look something like this:
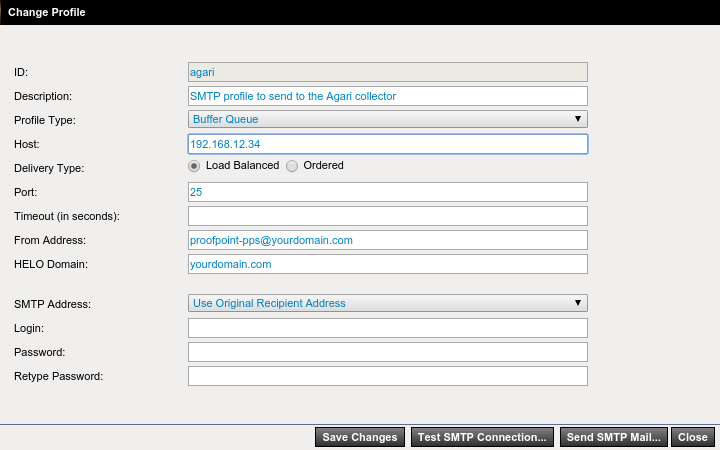
NOTE: A connection attempt to the specified port will be attempted, though no message will be delivered. If the sensor is not running, this will cause the dialog window to take a long time to close, because first it will time out and then prompt you to continue or cancel.
Step 2: Create a Spam Detection Rule
Create a spam detection rule to tell Proofpoint to send a copy of all messages to the sensor using the SMTP profile you created in Step 1: Create an SMTP Profile. Note that in order for this to work, Spam Detection must be enabled at Spam Detection > Settings. If you are not using Spam Detection in Proofpoint, and would prefer not to, you can use an Email Firewall Rule instead (see the end of this section).
- Go to Spam Detection > Policies > Rules.
- The last rule in the list is the Not Spam rule. Find this rule and click Edit.
- The "Not Spam" rule is loaded into the rule editor. You may need to change the message header as per the section marked "Important" below.
- If your Proofpoint MTA is a perimeter MTA, edit the rule to add an X-Agari-Authentication-Results header to “Not Spam” messages. Note that you must enable SPF evaluation in your Proofpoint system for this to work, as discussed in Step 3: Enable SPF Detection.
- Click Add.
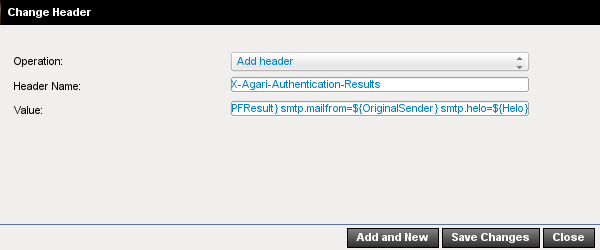
- For Header Name, enter the string X-Agari-Authentication-Results being careful to type it in exactly as shown, with no trailing colon.
- For Value, enter the following string (copy and paste may be advisable), also being careful not to make any typos or alterations whatsoever, except to change “mx.yourdomain.com”:
- Enter a value for “mx.yourdomain.com” that represents the authenticating authority. If your company is “yourdomain.com”, you might choose “mx.yourdomain.com” or “proofpoint.yourdomain.com” or some similar identification to represent the mail system doing the authentication. For more information about choosing this value, see RFC 5451, section 2.3.
- Click Save Changes.
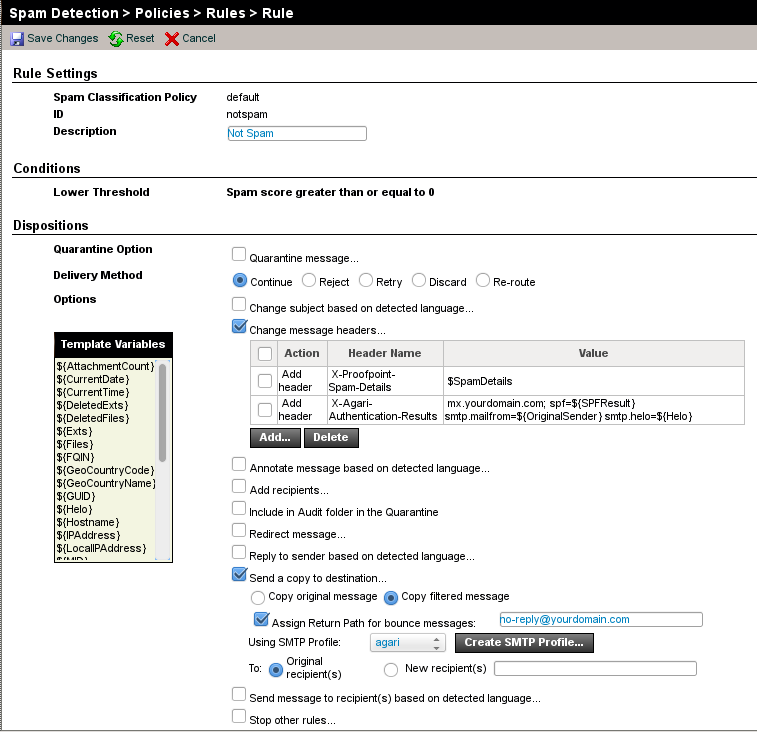
- On the Rule Edit screen, select the Send a copy to destination check box.
- Select the Copy filtered message check box.
- In the Using SMTP Profile drop-down list, select the profile you created in Step 1: Create an SMTP Profile.
- Do not change the Delivery Method and do not enable "Stop other rules..." unless instructed to by your mail administrator. Changing these settings could stop incoming mail for your organization.
- Select the Assign Return Path for bounce messages check box and set the Return-Path value to something like “no-reply@yourdomain.com.”
- Click Save Changes.
The Not Spam rule will probably already have the box checked for “Change message headers…” (to add an “X-Proofpoint-Spam-Details” header, for example). The sensor ignores this setting.
NOTE: This next step, relating to the X-Agari-Authentication-Results header, should only be performed if your Proofpoint MTA is a “perimeter” MTA. If, instead, your Proofpoint MTA is downstream from a perimeter MTA, then the information added with this header is likely to be incorrect, and creating the header would corrupt the information you see in Cloud Email Protection. In that case, skip the instructions for changing the header.
mx.yourdomain.com; spf=${SPFResult} (sender IP is ${IPAddress}) smtp.mailfrom=${OriginalSender} smtp.helo=${Helo}
Your “Change Header” dialog will look something like this (note that the Value field is truncated in this image):
In the event that the Sensor should be unreachable, prevent SMTP bounces generated locally from being sent back to the original senders. Further, you should prevent your Proofpoint system from generating duplicate copies that it queues itself. To do this, choose a deliverable “black-hole” address for this field – in other words: an address that will not actually buffer or otherwise store the message, but will simply drop it upon delivery.
NOTE: The Proofpoint interface does not allow setting a “<>” value here. If you simply make up a non-existent address, Proofpoint may buffer the bounces and thus consume system resources. If you have no such black-hole address at the destination MTA, you could create an appropriately-configured Email Firewall rule with a “Discard” disposition.
The rest of the options can remain at their defaults. Your Not Spam rule will look something like the following (remember that the “X-Agari-Authentication-Results” header shown in the image below should not be added unless the instance being configured is a perimeter MTA):
Confirm that the rule appears something like this in the Spam Rules list:

Confirm Traffic Flow
You can confirm the traffic flow by logging into Cloud Email Protection at https://ep.agari.com and navigating to the Sensors status page. It may take some time for data to begin to appear.
Non Spam Detection Environments
If you don’t have spam detection enabled in your Proofpoint system, and do not wish to enable it, you can achieve something similar using the email firewall. Briefly: you add a new rule, create a condition that restricts the rule to just the inbound email policy route, make sure the Delivery Method is set to “Continue,” and configure the other options as described above for the Spam Detection rule. By default, the new Email Firewall Rule will be added as the last entry. This may be appropriate, but take care with respect to the other rules to make sure that all mail that makes its way through the Proofpoint filters is delivered to the Sensor. For example, in the default Proofpoint configuration, senders that are on the “trusted” list receive a disposition of “Deliver Now” which will cause all following rules to be ignored, including the “Send a copy” rule. You can solve this problem for any such rules by editing them, enabling the “Send a copy to a destination…” option following the same pattern as described above, and otherwise preserving their existing settings.
Note also that using an email firewall rule instead of the spam detection rule may cause spam to be sent to the sensor; this could be acceptable, but may have performance implications for either your Proofpoint system or the sensor, depending on the volume of spam you process.
TIP: This SPF section applies only to Proofpoint systems that are functioning as perimeter gateways.
The analysis of the email messages coming into your enterprise is improved when SPF (Sender Policy Framework) checking is performed on each message. This checking must be performed as messages arrive at your perimeter gateway(s) and the results added to the messages’ headers prior to relaying them further internally. To generate the associated X-Agari-Authentication-Results email headers, SPF must be enabled on the perimeter Proofpoint system(s).
- Go to Email Firewall > SPF > General.
- For SPF Enable, select On. You can configure Proofpoint to disable SPF checking for certain policy routes, as desired. For example, by default it will not evaluate SPF for outbound mail. As long as the inbound mail is being checked, the sensor can do its job.
- Click Save Changes.
TIP: More recent versions of Proofpoint have this at Email Authentication > SPF > General.
Your SPF settings may look something like this:

Step 4: Configure TLS Encryption
If your sensor is hosted, not within your trusted network, and you do not wish to send unencrypted email across the public Internet, the sensor can accept TLS-encrypted connections (over port 25, via “STARTTLS”), but you will need to configure Proofpoint to do so.
TLS Encryption must first be enabled in the System > SMTP Encryption > Settings menu. Full configuration of TLS is beyond the scope of this document, but your settings might look something like this:
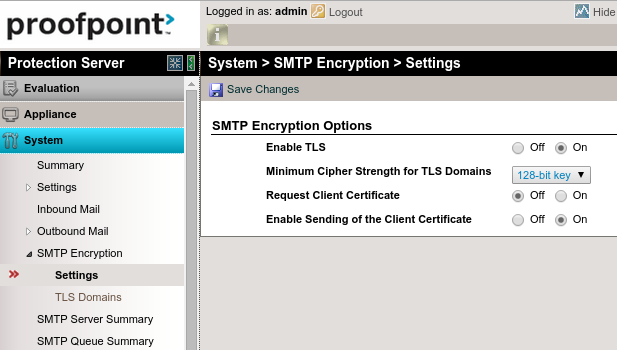
NOTE: Enabling TLS Encryption may have performance implications for your Proofpoint system: once enabled, Proofpoint defaults to using TLS when it is available. This may or may not be desired. For example, if Proofpoint is relaying received mail to other servers that live safely within your private network, you may not want to encrypt those internal connections. You can configure which servers will and will not connect via TLS.
Once TLS is enabled, Proofpoint will use TLS when it can, so it should start encrypting the mail stream to the Sensor; however, if you want to be certain that the connection is encrypted, you can add an explicit rule.
- Go to System > SMTP Encryption > TLS Domains.
- Click Add.
- Enter the IP address of your sensor
- Configure the options in the window to look something like this (again, your choices may vary according to need):
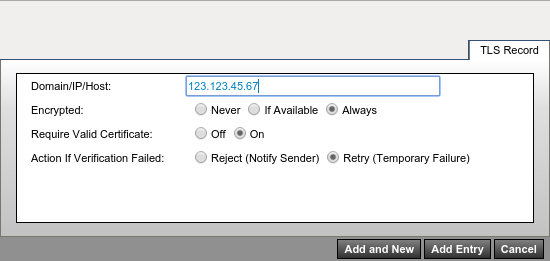
You can repeat that process for each sensor your system will connect to. Some may require TLS, some may not.
If you prefer to keep your regular email stream to internal mail servers unencrypted, you can add another TLS Domains for each server and set the “Encrypted” value to “Never.”
Step 5: Confirm/Configure System Alerts
If you followed the above instructions, your system should handle a temporary connectivity problem with the sensor without generating bounces to either the original senders or to an address in your own system. But it will still be queuing messages bound for the sensor. If a short connectivity outage is anticipated, this may not be a problem. In the event of a longer outage, you will probably want to disable the rule that sends the copies to the sensor.
It is recommended that you confirm that your Proofpoint system is configured to alert you when SMTP queues are getting too large. In System > Alerts > Rules you can confirm that “SMTP queue above threshold” is a subscribed alert, and that someone will receive such alerts if they occur. Additionally, you can adjust the Timeout value for the SMTP Profile, as described in the instructions above, to instruct the Proofpoint servers not to spend too much time attempting to deliver messages to the Sensor.
Step 6: Add the X-Agari-Authentication-Results Header (Only for a Perimeter Gateway)
This section is intended for use only in cases where the Proofpoint system you are configuring is a perimeter gateway and is not being used for dual delivery. If you are using your Proofpoint system to generate the dual delivery stream, then do not use this section, and instead follow the above instructions (starting at the beginning with Step 1: Create an SMTP Profile), which include the proper way to add the X-Agari-Authentication-Results header in that case.
If your Proofpoint system is a perimeter gateway and you want to add the X-Agari-Authentication-Results header, follow these instructions.
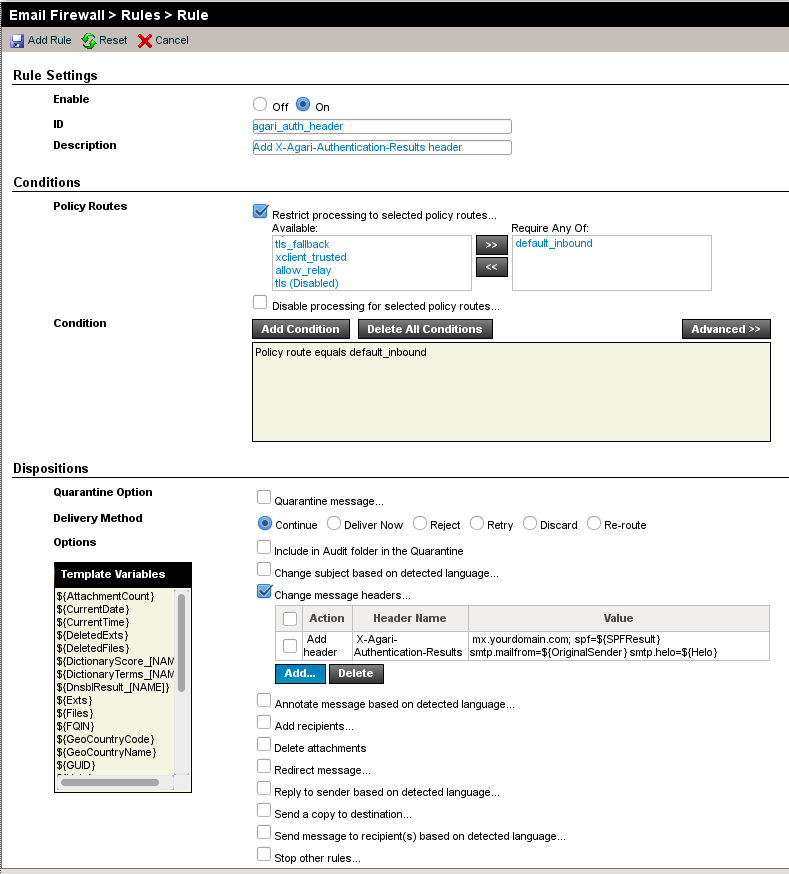
- Go to Email Firewall > Rules.
- Click Add Rule.
- Select or enter the following values:
- Enable: On
- ID: Something like agari_auth_header
- Description: Something like Add X-Agari-Authentication-Results header.
- In the Conditions section for the rule, click Add Condition. The idea here is to apply this rule only to inbound mail. Usually this will mean the “default_inbound” policy route, but this may be different depending on how routing is set up or named in your organization.
- Select default_inbound (or whatever route(s) is/are appropriate).
- Click the chevron to move the route(s) over to the right-side, into the Require Any Of list.
- In the Condition section, click Add Condition.
- Select or enter the following values:
- Condition: Policy Route
- Operator: to Equals
- Click Add Condition to add the condition. Alternately, if you have multiple Policy Routes representing inbound email, click Add and New Condition and set the next Condition to Add condition to Or. You can add as many conditions as you need to this Email Firewall Rule to ensure that all inbound email policy routes are covered.
- Continuing on the Email Firewall Rule creation page, in the Dispositions section, select the Change message headers check box.
- Click Add.
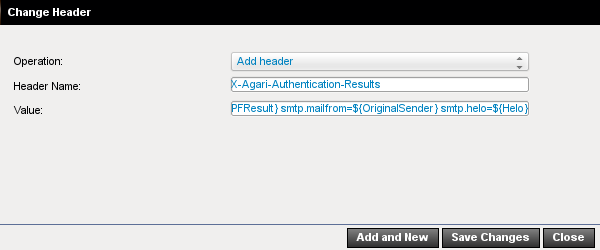
- In the Change Header dialog box, select or enter the following values:
- Operation: Add header
- Header Name: Enter the string X-Agari-Authentication-Results being careful to type it in exactly as shown, with no trailing colon.
- Value: Enter the following string (copy and paste may be advisable), also being careful not to make any typos or alterations whatsoever, except to change “mx.yourdomain.com” (as explained in the following paragraph):
- Click Save Changes.
- Do not change the Delivery Method from Continue unless instructed to by your mail administrator. Changing that setting could stop incoming mail for your organization.
- Click Add Rule.
- Confirm that the rule appears something like this in the Rules list:
The Route for the condition should be set to whatever Policy Route you use to represent inbound email to your organization. The default for Proofpoint is the “default_inbound” Policy Route. Your organization may route differently, and a more involved setup may require more nuance with the Conditions, but the simple idea is that mail destined for users inside your organization should be caught by this set of Conditions.
This Condition is redundant in light of the “Restrict processing to selected policy routes…” setting just above it, but Proofpoint requires that a Condition be specified.
mx.yourdomain.com; spf=${SPFResult} (sender IP is ${IPAddress}) smtp.mailfrom=${OriginalSender} smtp.helo=${Helo}
“mx.yourdomain.com” can be chosen by you to represent the authenticating authority. If your company is “yourdomain.com”, you might choose “mx.yourdomain.com” or “proofpoint.yourdomain.com” or some similar identification to represent the mail system doing the authentication. For more information about choosing this value, see RFC 5451, section 2.3.
Your Change Header dialog box will look something like this (note that the “Value” field is truncated in this image):
The rest of the options can remain at their defaults. Your firewall rule will look something like the following:

You will want to pay some attention to the order of this rule: ideally, it should be placed at or near the top of the firewall rule list, to ensure that no other firewall rule interferes with its operation. You can drag the rule to reorder it, or use the up/down arrows in the Order column.
That should be all that is required to add the important header. You should also confirm that evaluation of SPF, DKIM, and any other authentication mechanisms (Sender ID, DMARC, etc.) is actually enabled, so that the X-Agari-Authentication-Results header is actually populated with useful information. Please contact a Proofpoint support representative if you have any questions about this process.
Wrapping Up
When the above steps are completed, the sensors will start receiving copies of email messages sent into your organization. There may be a small delay of a few minutes before the changes take full effect. You can confirm the traffic flow by logging into Fortra Cloud Email Protection at https://ep.agari.com and navigating to Manage > Sensors to see the status of your installed sensors.