Configure Dual Delivery: Microsoft Exchange
This
The steps for configuring Exchange dual delivery are similar for all versions (2010, 2013, 2016 and 2019) of Exchange, but the Exchange administration user interface changed from the 2010 version to the 2019 version.
You will configure a send connector that will be used for journaling. In Microsoft Exchange, a journal recipient can be a mailbox or a contact. When you use a contact, you can define it using a placeholder domain. By doing so, you can use that contact as the destination for the send connector. This allows messages to be sent to dev/null if the Sensor is for some reason not reachable, instead of letting the transport queue back up.
TIP: For most environments, you will want Premium Journaling, which requires Exchange Enterprise licensing from Microsoft and may include server licenses or client access licenses (CALs). Premium Journaling licensing allows you to use journal rules to define both recipients and scope. Microsoft also offers Standard Journaling, which is all-or-nothing journaling on mailbox databases on all Exchange servers. If you have only a Standard Journaling license and you are already using journaling for another purpose, you may be able to set up separate journaling to the Agari Sensor.
Configure Dual Delivery: Exchange 2010
Configure Dual Delivery: Exchange 2013/2016/2019
Each configuration comprises 3 parts:
- Create a placeholder domain
- Create a contact using that placeholder domain
- Create a send connector
Cloud Email Protection requires that the X-MS-Exchange-Organization-AuthAs: header with the correct value for message directionality be added to all messages. See the Microsoft Exchange documentation for instructions about how to configure this. The following header and values are required for Cloud Email Protection to function correctly:
- Internal messages: X-MS-Exchange-Organization-AuthAs: Internal
- Inbound/outbound messages: X-MS-Exchange-Organization-AuthAs: Anonymous
Inbound and outbound messages that add the Internal value for this header will be treated by Cloud Email Protection as internal messages and will be scored differently, which can make Cloud Email Protection less effective against external attacks. See https://docs.microsoft.com/en-us/exchange/mail-flow/connectors/allow-anonymous-relay?view=exchserver-2019 and https://docs.microsoft.com/en-us/powershell/module/exchange/mail-flow/set-inboundconnector?view=exchange-ps for additional information.
Configure Dual Delivery: Exchange 2010
Create a placeholder domain: Exchange 2010
- In the Exchange Management Console, go to Organization Configuration > Hub Transport.
- Click the Remote Domains tab.
- Click New Remote Domain.
- Enter agari.sensor.
- Click Next.
- Click Finish.
- Click Apply.
- Click OK.
Create a contact using the placeholder domain: Exchange 2010
- Go to Create Contact.
- Enter the following values:
- FirstName: Agari
- LastName: Sensor
- Alias: Agari Sensor
- External Email Address: journal@agari.sensor
- Save the contact.
Create a send connector: Exchange 2010
NOTE: If you override defaults on send connectors in Exchange to increase the maximum message size, be sure to increase the Agari Sensor maximum message size also, from the default of 35MB up to 100MB (the maximum amount allowed).
- Sign in to Exchange Management Console (2010).
- Create a new Send Connector.
- Enter/Select the send connector details:
- Name: Agari Sensor
- Select the intended use for this Send connector: Custom

- Click Add.
- Enter the information about the SMTP Address Space:
- Type: SMTP (This is the default and it cannot be changed here.)
- Address Space: agari.sensor
- Cost: 1

- Click OK.
- Click Next.
- For Network settings, select Route mail through the following smart hosts.
- Click Add.
- Enter the IP address of the sensor.
- Click OK.
- For Configure smart host authentication settings, select None.
- Click Next.
- For Source server, make sure you have the correct email gateway server selected.
- Click Next.
- Review the settings to make sure they are correct.
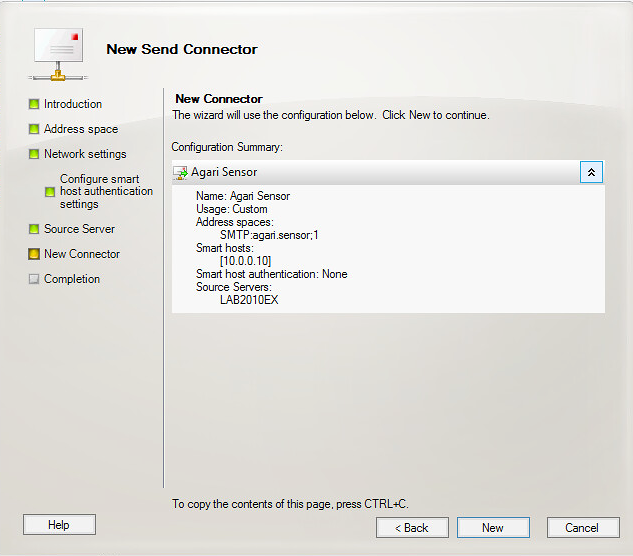
- Click New.
- Create a new Journal Rule.
- Enter the journal rule settings:
- Make sure the domain matches the Send Connector in the previous step.
- Rule name: Agari Sensor
- Send Journal reports to email address: journal@agari.sensor
- Scope: Global - all messages
- Select the Enable Rule check box.

NOTE: If you select External - messages with an external sender or recipient Messages, the Exchange journaling functionality may miss external messages spoofed as being from internal domains.
- Click New.
- Review the settings to make sure they are correct.
- Click Finish.
Configure Dual Delivery: Exchange 2013/2016/2019
Create a placeholder domain: Exchange 2013/2016/2019
TIP: The ability to create placeholder domains was removed from the Exchange Management Console in the 2013/2016/2019 versions, so this must be done at the command line.
- Open the Exchange Management PowerShell.
- Enter the following commands:
- Create the placeholder domain:
New-RemoteDomain -DomainName agari.sensor -Name "AgariAPD" - Set up auto-forward:
Get-RemoteDomain | Where {$_.DomainName -eq "agari.sensor"}
| Set-RemoteDomain -TNEFEnabled $false -AutoForwardEnabled $true - Verify:
Get-RemoteDomain | Where {$_.DomainName -eq "agari.sensor"}
|Format-table Name, DomainName, TNEFEnabled, AutoForwardEnabled
- Create the placeholder domain:
Create a contact using the placeholder domain: Exchange 2013/2016/2019
- Go to Create Contact.
- Enter the following values:
- FirstName: Agari
- LastName: Sensor
- Alias: Agari Sensor
- External Email Address: journal@agari.sensor
- Save the contact.
Create a send connector: Exchange 2013/2016/2019
- Sign in to Exchange Admin Center (2013/2016/2019).
- Create a new Send Connector.
- Enter/Select the send connector details:
- Name: Agari Sensor
- Type: Custom

- Click Next.
- For Network settings, select Route mail through the following smart hosts, and add the IP address of the sensor.

- Click Next.
- For Configure smart host authentication settings, select None.
- Click Next.
- For Address space, enter agari.sensor and SMTP.
- Click Next.
- For Source server, make sure you have the correct email gateway server selected.
- Click OK.
- Create a new Journal Rule.
- Enter the journal rule settings:
- Send Journal reports to: journal@agari.sensor
- Name: AgariSensor
- If the message is sent to or received from: Apply to all messages
- Journal the following: All messages
NOTE: If you select External Messages, the Exchange journaling functionality may miss external messages spoofed as being from internal domains.

- Click Save.
Test Exchange Dual Delivery
- Send a test message from outside your organization/network to one of your users.
- Review in Cloud Email Protection that the message was ingested.