Configure Dual Delivery: Cisco ESA
This
The general procedure is as follows:
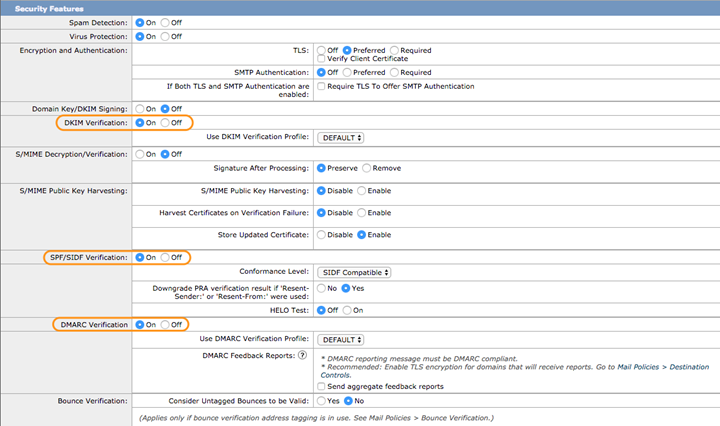
Step 1: Enable SPF/DKIM/DMARC checking in the Cisco ESA.
Step 2: Create a content filter that uses the Bcc: action to copy messages to the sensor.
Step 3: Configure the appropriate mail policies to reference that filter so that only delivered mail (and not spam or PVO (policy, virus, and outbreak) quarantined mail) is copied to the sensor.
Step 4: Configure bounce handling to properly manage unexpected delivery failures.
Step 5: Confirm that any desired system alerts are in place to inform administrators of any problems.
Important Consideration Regarding the "Authentication-Results" Header
The Sensor depends on the presence of an accurate, uncorrupted Authentication-Results header to help evaluate a sending identity. Typically, the "perimeter" MTA for your enterprise (meaning, the first point of entry into your enterprise from the sending MTAs on the internet) will evaluate the incoming messages and add an Authentication-Results header, and any downstream MTAs in your institution will be carefully configured to preserve the integrity of this header (that is, they must not overwrite it with their own header unless they are able to do so with accurate information, and they must not strip the header from the message).
However, mail routing environments can be complex, and it's not always practical to ensure integrity of the header for every downstream MTA. To simplify the situation, sensors will first look for a duplicate of the header called X-Agari-Authentication-Results. If they find none, they will fall back to the Authentication-Results header.
This allows you to configure your perimeter MTA to create (or duplicate) the Authentication-Results header under an alternate name: it will stand a greater chance of making it through your various downstream MTAs without being corrupted. Instructions for how to do this for various MTA products are included in this guide.
Step 1: Enable SPF/DKIM/DMARC checking in the Cisco ESA
- Go to Mail Policies > Mail Flow Policies.
- Click Default Policy Parameters.
- Ensure that DKIM Verification, SPF/SIDF Verification, and DMARC Verification are all set to On. Leave the related settings as shown below.
Step 2: Create a Bcc: Filter to Divert Messages
- Log into the Cisco ESA (Email Security Appliance) as an Administrator user.
- Go to Mail Policies -> Incoming Content Filters.
- Click Add Filter and give the filter a recognizable name, such as "CEP_sensor."
- In the Description field, enter a description so that future administrators will understand what the filter is for and who to contact. For example: "This is a filter to send a BCC stream of messages to a Sensor, where certain aspects of the message headers and authentication data are saved and communicated. Questions? Contact Joe Administrator at joeadmin@example.com"
- Order the filter so that it enables the Sensor to receive all messages that are going to be delivered to the end user after all spam and virus scanning has occurred, and after any other message filtering policy that would drop messages. If you have other advanced filtering uses where a filter triggers immediate delivery and circumvents subsequent filters in the “master list” of content filters, you should consider these and place the Sensor filter appropriately for the desired result: collection of all messages delivered to the user.
- Optionally add a condition to the content filter. Depending on your environment, the filter can be associated with a specific Incoming Mail Policy (see later in these instructions) for certain recipients or domains. If there is filtering logic such that messages found to be anti-spam positive or anti-virus positive are not dropped (and are not delivered on to the user), then you will need to include conditions in the filter so that the Sensor filter will not match. Otherwise, you can skip adding a condition to the content filter and it will evaluate to “True” for any message. Again, the goal of the content filter is to only work on messages that are going to be delivered directly to the end user.
- Add actions to add headers to the message. You will add an X-Agari-Original-From and an X-Agari-Original-To to messages, and if your Cisco ESA is a perimeter gateway, you will also add an X-Agari-Authentication-Results header. You add one header per action, so repeat the following sub-steps for each action.
- Click Add Action.
- In the Add Action dialog box, select Add/Edit Header.
- Enter a Header Name value per the table below.
- Select Specify Value for New Header and enter a value per the table below.
- Double check the names for typos.
- Click OK.
Header Name Value Specify Value for New Header Value X-Agari-Original-From $EnvelopeFrom X-Agari-Original-To $enveloperecipients X-Agari-Authentication-Results $Header['Authentication-Results']
NOTE: Add this header only if your CISCO ESA is a perimeter gateway MTA.
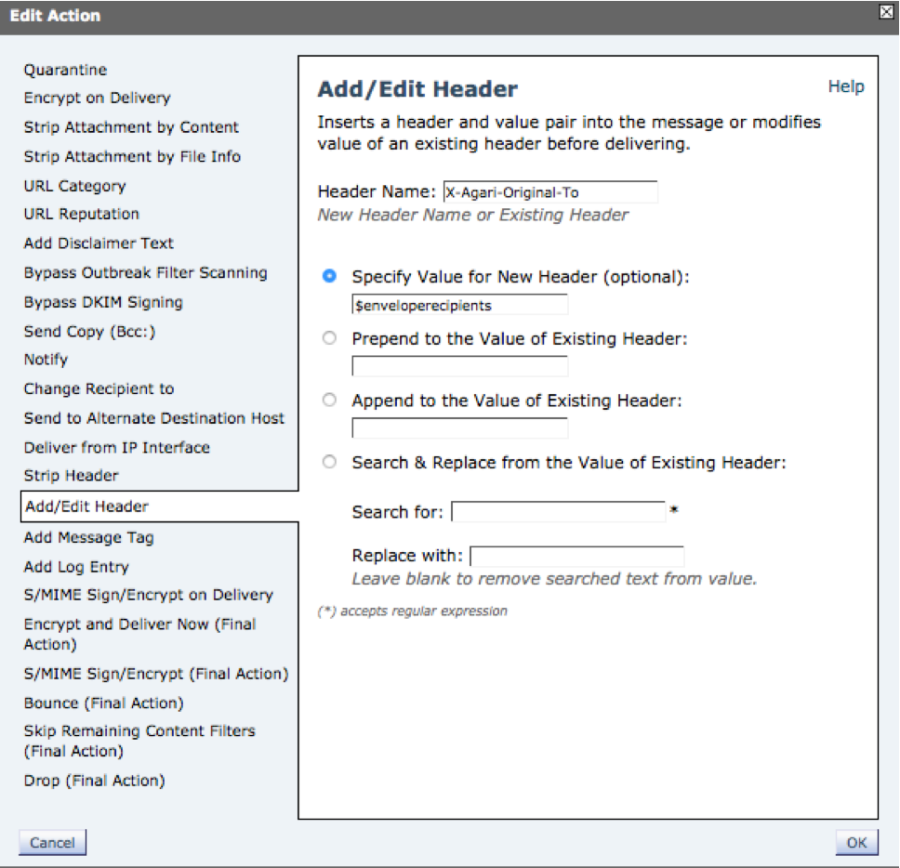
Example Content Filter Action for the X-Agari-Original-To header.
- Create the primary action for this filter: to BCC the entire message into the sensor.
- The Email Address for the BCC action should be:
- [username]@[symbolic_name].hosted.Agari.com (for Agari-hosted Sensors)
- [username]@[sensor_IP_address] (when Sensors are in your own infrastructure)
- The Subject of the Bcc: message should be the same as original, so leave the Subject field as "$Subject"
- The Return Path entry should initially be set to an appropriate address where bounces are either entirely ignored, or monitored for failure to deliver into the Sensor. Do not leave the Return Path field blank. Doing so could expose the original message sender to bounce-backs in case of problems delivering to the Sensor. Once you are certain that your configured delivery is operating correctly, you can later change the Return Path entry to be "<>", which causes any explicit delivery failures to be immediately deleted from the delivery queue.
- If the domain specified in the Bcc email address will not result in the message being delivered to the appropriate desired destination, you can use an "Alternate Mail Host" entry. The result of this setting will be such that the delivery attempt will be made directly to the specified host rather than to whatever is specified by the MX record of the Email Address or the Cisco ESA's "SMTP routes" feature. In other words, you can use this field to directly specify the host or IP address of the Sensor (IP addresses should be enclosed in square brackets, e.g. [123.123.45.67]). Note that the domain used in the Email Address specified above is still relevant to Bounce handling, as described below.
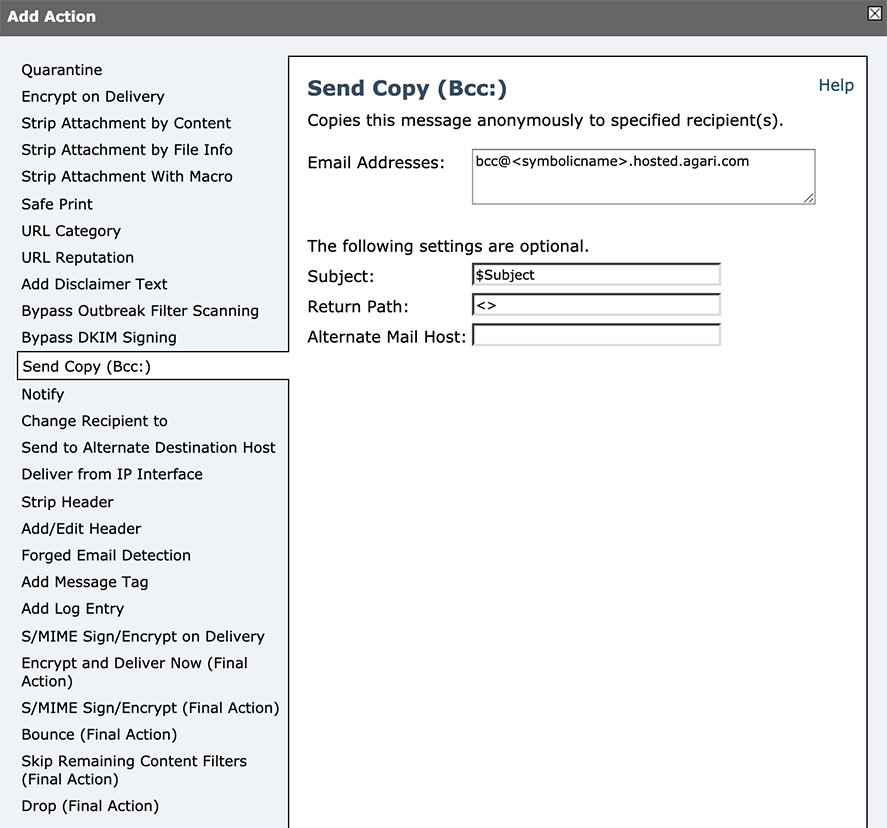
Bcc: action - The Email Address for the BCC action should be:
- Click OK.
This example shows the above content filter definition (prior to clicking Submit):
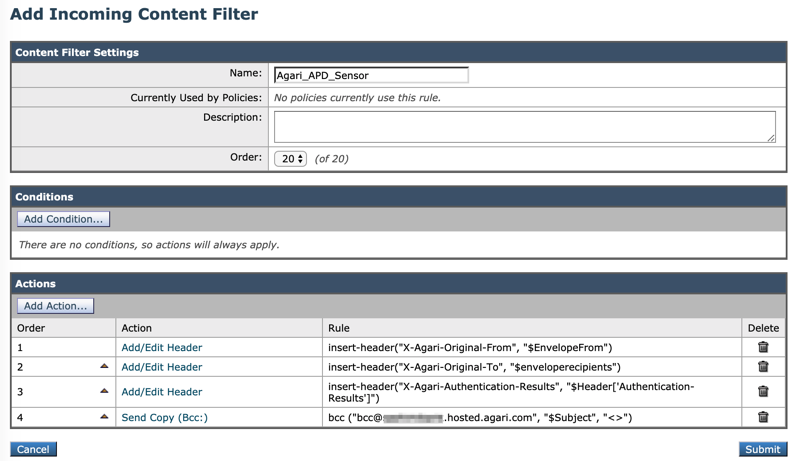
Content filter summary - Click Submit to save the new filter.
- Associate the filter with all appropriate Incoming Mail policies.
- Go to Mail Policies -> Incoming Mail Policies.
- In the Content Filters column for the appropriate row, edit the assigned Content filters to reference (enable) the newly created filter. You may need to Enable Content Filters entirely for that Policy in the process.
- Click Commit Changes.
NOTE: If your Cisco ESA environment is configured for cluster management: the following steps should be completed at either the top Cluster level or at a subgroup level if the action is intended to only affect a certain set of Email Security Appliance (ESA) instances.
NOTE: The above image shows the X-Agari-Authentication-Results header being added: you should only add this header if your Cisco ESA MTA is a perimeter gateway MTA. If your Cisco ESA MTA is downstream from the perimeter gateway(s), then you should not add this header.
The modified Policy row may look like this:

TIP: Remember that any policy that delivers mail to end users (and doesn’t put messages in a quarantine folder or delete the messages) should reference the content filters used to BCC messages to the sensor. The sensor should get a BCC copy of all delivered messages, but not any spam or virus mail that is dropped or quarantined.
Note that after committing changes, mail will begin to route to the Sensor. If there is any issue with messages bouncing, your system may be burdened. Alternatively, you may wait to Commit Changes until completing the Bounce handling steps in the next section.
Step 3: Exclude quarantined messages from being copied to the sensor
Spam, virus, graymail, and similar messages that your policies quarantine should not be sent to the Fortra Cloud Email Protection sensor. To exclude these quarantined messages from being impacted by the BCC content filter created above, you can add an action to the Incoming Mail Policies to insert specific headers for the different types of quarantined messages, and then use the existence of any of those headers as a condition to exclude the messages from being triggered by the content filter and copied to the sensor.
If your policies do not add custom headers to your messages to identify them as spam, you may also want to modify the policies to which this filter will be attached to that the filter condition can properly identify the messages to exclude.
Modify the Policies That Will Use This Filter
This will add one or more custom headers to a policy. The goal here is to perform this action on any policies you have defined that are used to identify spam and quarantine messages.
- Go to Mail Policies > Incoming Mail Policies.
- Click the anti-spam, (for spam), anti-virus, advanced malware protection, or graymail (for quarantined messages) settings in the row of the policy you want to edit.
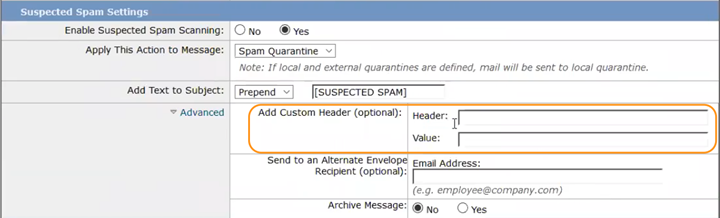
- Click Advanced. (Depending on which setting you’re modifying, it could be in the Suspected Spam Settings, Virus Infected Messages, or Action on Bulk Email sections.)
- In the Add Custom Header section, enter values for Header and Value. The header should be both unique and self explanatory. For example, for spam, it could be MyCompany_suspected_spam. The value should be something that makes sense for the vocabulary you use, such as positive or true.
- Make note of the Header value so you can use it in the next section, Add a Condition to the Filter.
- Click Submit.
Repeat for all of the spam, anti-virus, and graymail policies that quarantine messages.
TIP: Your policy may also modify message subjects when identifying spam. For example, some companies will configure a spam rule to prepend [SUSPECTED SPAM] to identified spam messages. While you can configure a policy condition to match message modifications in the subject, doing so is more complicated and can take longer. Matching header values is both faster and more reliable.
- Go to Mail Policies > Incoming Mail Filters.
- Click the name of the filter you created in step 1.
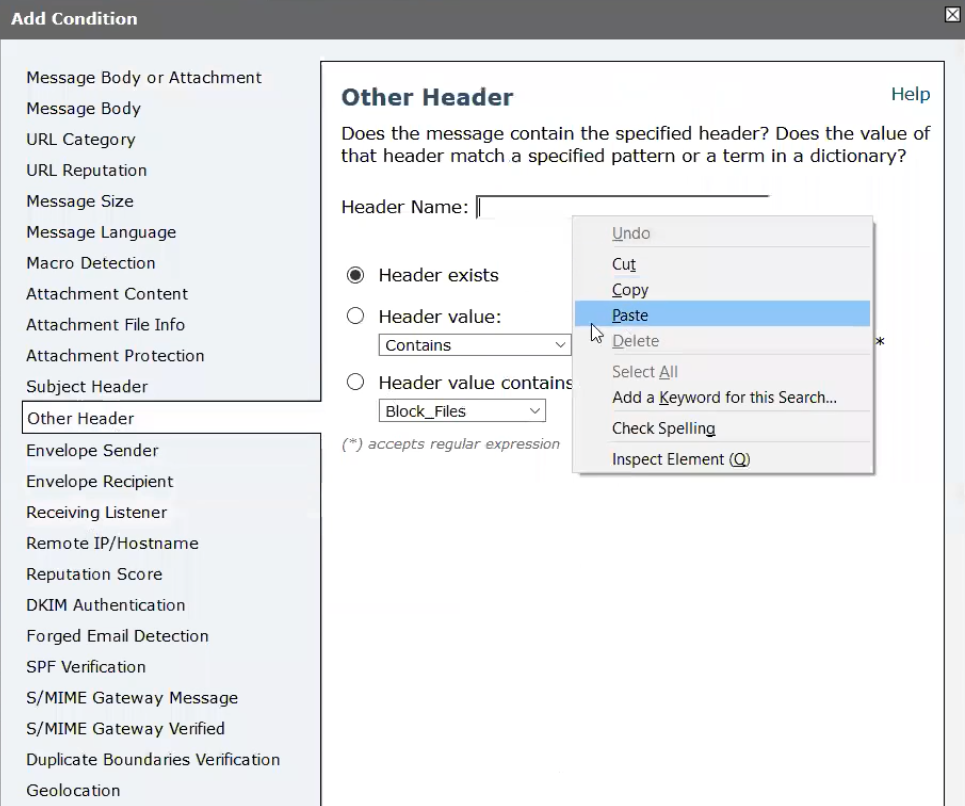
- Click Add Condition.
- Click Other Header.
- In the Header Name field, enter the name of a custom header you created in Modify the Policies That Will Use This Filter.
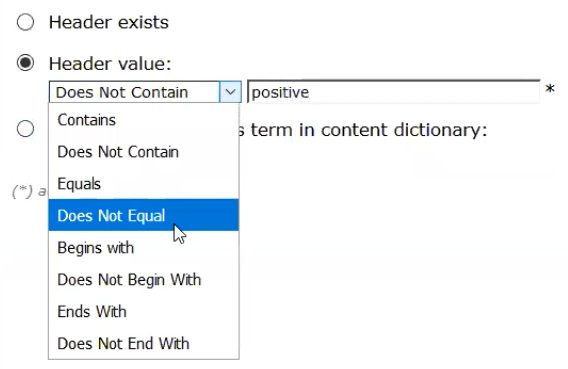
- In the Header Value drop-down list, select Does Not Equal, and then enter the value of the custom header you created above.
- Click OK.
- Repeat steps 3 through 7 for all the headers you added in Modify the Policies That Will Use This Filter.
- In the Apply Rule drop-down list, select Only if all conditions match.
- Click Submit.

If you remember, in step 1, this content filter was configured to send a copy via bcc: to the Cloud Email Protection sensor. This condition now modifies this directive to send a copy via bcc: to the Cloud Email Protection sensor except if there is a custom header in the message that exists because the message was identified as spam.

Note that this content filter must be referenced in and enabled on any policies where you want this filter to be used. Make sure that the policies where you added custom headers to be used by content filters have those content filters included and active in the policies.
Step 4: Configure Bounce Handling to the Sensor
To use minimal ESA system resources, you should configure the system to fail bounce messages rapidly if delivery to the Sensor fails.
- Provide an email address that the Bcc: is delivered to that is within a unique domain or subdomain and that is accepted by the destination host. The "Alternate Mail Host" delivery action should take care of the message being directed to that server, so there is no need to create a specific DNS entry for the email address's domain. For the purposes of this example we will use "symbolic_name.hosted.agari.com" for the domain.
- Create a Bounce Profile to rapidly fail bounce messages.
- Go to Network > Bounce Profiles.
- Click Add Bounce Profile to create a new entry.
- Enter values as shown in the following figure:

- Create a specific Destination Control for the unique Sensor domain described above ("symbolic_name.hosted.agari.com", in this example) that references the aggressive Bounce Profile created in the previous step (named "Impatient" in this example):
- Go to Mail Policies -> Destination Controls.
- Enter values as shown in the following figure:
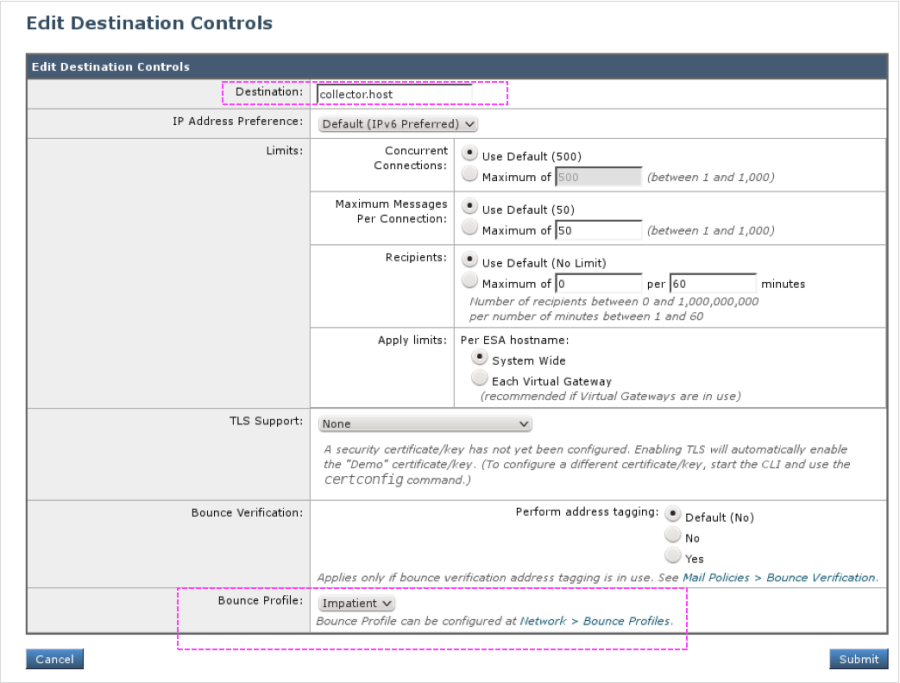
- If your Sensor is not inside your protected network and you would like to encrypt the stream of mail going to it, you can change the TLS Support option to Required. The Cisco ESA will now connect securely to the remote Sensor (over port 25 via "STARTTLS").
- Click Commit Changes.
Step 5: Confirm System Alerts
Go to System Administration > Alerts and confirm that System and Hardware alerts will be sent to an address that is monitored in case there are any issues with the dual delivery setup and configuration.
Configure Cisco ESA to Add an X-Agari-Authentication-Results Header
This section is intended only for the cases where the Cisco ESA system you are configuring is a perimeter gateway and is not being used for dual delivery. If you are using your Cisco ESA system to generate the dual delivery stream, then do not use this section; instead follow the above instructions which include the proper way to add the X-Agari-Authentication-Results header.
- Log into the Cisco ESA as an Administrator.
- Go to Mail Policies > Incoming Content Filters.
- Click Add Filter.
- Name the filter "Agari_auth_header."
- Add a reasonable description for the filter, for example: "Add the X-Agari-Authentication-Results header to all incoming email."
- Adjust the order of the filter so such that it adds the header to all incoming email. The filter, then, should be placed at or near the top of the list: consider this filter's placement with respect to your existing filter.
- The filter does not need any Conditions; a filter with no conditions defaults to matching all messages. Depending on the environment, you can associate the filter to a specific Incoming Mail Policy (as described below) for certain recipients or domains.
- Add 3 actions to add headers to messages. See Important Consideration Regarding the "Authentication-Results" Header. Repeat these steps, using the values in the table below for each step:
- Click Add Action.
- In the Add Action dialog box, click the Add/Edit Header tab.
- Click the Specify Value for New Header (optional) option.
- Enter a value in that field from the table below.
- Click OK.
Value to Enter Purpose X-Agari-Original-From Header data: $EnvelopeFrom Original sender. X-Agari-Original-To Header data: $enveloperecipients Original recipient. Header Name: X-Agari-Authentication-Results ”Specify Value for New Header": $Header['Authentication-Results'] Duplicates Authentication-Results header.
- The completed incoming content filter will look something like this:
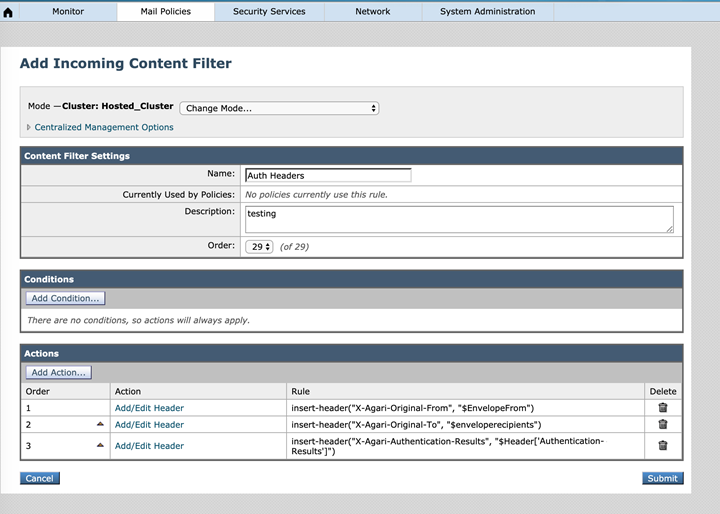
- Click Submit.
- Associate the filter with an appropriate Incoming Mail Policy:
- Go to Mail Policies > Incoming Mail Policies.
- In the Content Filters column for the appropriate row, edit the assigned Content filters to reference the newly-created filter. You may need to enable Content Filters for that Policy in the process. The modified Policy row will look similar to the following:
- Click Commit Changes.
TIP: If your environment is Clustered, execute the remaining steps at either the top level or at the group level (if the action is intended to only affect a certain set of ESA instances). Do not add perform these steps at the machine level.

NOTE: You should also confirm that evaluation of SPF, DKIM, and any other authentication mechanisms (Sender ID, DMARC, etc.) is enabled on the ESA, so that the "X-Agari-Authentication-Results" header will be populated with the correct data.
Wrapping Up
When the above steps are completed, the sensors will start receiving copies of email messages sent into your organization. There may be a small delay of a few minutes before the changes take full effect. You can confirm the traffic flow by logging into Cloud Email Protection at https://ep.agari.com and navigating to Manage > Sensors to see the status of your installed sensors.