Configure Enforcement: Microsoft Exchange
This topic describes how to configure enforcement for Microsoft Exchange versions 2010, 2013, 2016 and 2019.
The general procedure is as follows:
Step 1: Upgrade your sensor to the latest version.
Step 2: Reboot the sensor.
Step 3: Configure Exchange enforcement.
Step 4: Enable enforcement in Cloud Email Protection.
Step 1: Upgrade Your Sensor
Your sensor must be upgraded to the latest version in order to perform enforcement.
You can upgrade your sensor in Cloud Email Protection or at the command line.
NOTE: You must reboot the sensor after upgrading before enabling.
Upgrade the Sensor in Cloud Email Protection
- Go to Manage > Sensors.
- Click Upgrade Now.
- Select the version with the most recent date. Versions are configured as YYYY.MM.DDHHMMSS, where YYYY is the year, MM is the month, DD is the day, and HHMMSSS is the time of the released version.
Any active sensor that is not running the most recent version will display an upgrade link.
Upgrade the Sensor From the Command Line
- ssh into the sensor machine.
- Enter the command:
sudo /opt/agari/bin/agari-ep update
Step 2:Configure Exchange Enforcement
- Sign in to Active Directory.
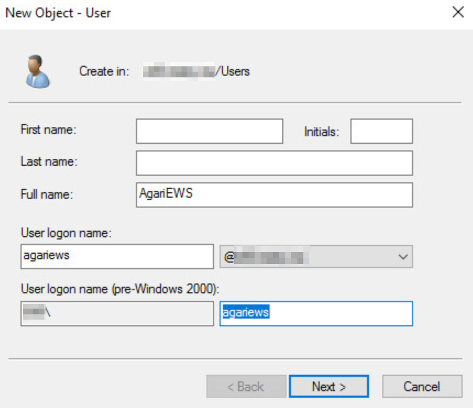
- Create a new user.
- Enter/select the user details:
- Full name: agariEWS
- User logon name: agariews
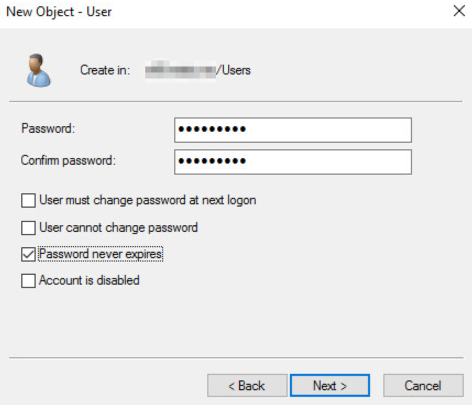
- Select the Password never expires check box and note the password that you enter.
- Grant Exchange impersonation rights.
- In the Exchange Management Shell (Powershell), run the command
- Configure the Exchange Web Services virtual directory Basic Authentication:
- Exchange 2010
- Open IIS 7.
- Expand Sites > Default Web Site.
- Select Exchange Web Services.
- Click Authentication.
- Make sure Basic Authentication is Enabled.
- Exchange 2013/2016/2019
- Go to Servers > Virtual Directories.
- Edit Exchange Web Services (Default Web Site).
- Click the Authentication tab.
- Make sure Basic Authentication is Enabled.
- Ensure the DNS value is correct for autodiscover. It should be: Autodiscover.domain.tld
- SSH into the sensor.
- Run the command
- Enter the password established when the sensor was first installed and booted.
- Use the service account you created at the beginning of the procedure. The username must be in the format domain\user (netbios\serviceAccount).To test enforcement goto step 8.
sudo /opt/agari/bin/configure-ews-enforcement
- Exchange 2010
- Configure the Exchange Web Services virtual directory OAuth Authentication using Azure Active Directory:
NOTE: OAuth authentication for EWS is only available in Exchange Online as part of Microsoft 365. EWS applications that use OAuth must be registered with Azure Active Directory. OAuth authentication for EWS is only available in Exchange Online as part of Microsoft 365. EWS applications that use OAuth must be registered with Azure Active Directory.
- Open Azure Active Directory admin center.
- Sign in using a Microsoft Account.
- Select Azure Active Directory , then select Manage > App registrations.
Select New registration. On the Register an application page, set the values as follows:
Set Name to a friendly name for your app.
Set Supported account types to My organization only.
Click Register. On the next page, copy the values of the Application (client) ID and Directory (tenant) ID and save them.
Select Manage > Manifest.
Locate the requiredResourceAccess property in the manifest, and add the following inside the square brackets ([]):
Copy{
"resourceAppId": "00000002-0000-0ff1-ce00-000000000000",
"resourceAccess": [
{
"id": "dc890d15-9560-4a4c-9b7f-a736ec74ec40",
"type": "Role"
}
]
}Select Save.
Select Manage > API permissions. Confirm that the EWS.AccessAsUser.All permission is listed.
Select Grant admin consent for org and accept the consent dialog.
Select Manage > Certificates & Secrets.
Select New client secret, enter a short description and select Add.
Copy the value of the newly added client secret and save it.
Run the command and select OAuth Authentication.
sudo /opt/agari/bin/configure-ews-enforcement
Select OAuth and follow the prompts to enter your information. Use the Tenant id, Client id, and Client secret values you saved from previous steps.
- Test enforcement.
- Run the command
sudo /opt/agari/bin/agari-ep test-api-creds user@email.address
- user@email.address should be a valid user, not the service account above.
- It may take up to 10 minutes for this test to complete successfully.
New-ManagementRoleAssignment -Name "Agari Sensor EWS" -Role "ApplicationImpersonation" -User "agariews"
NOTE:
1. Basic Authentication is available only for On-Perm Sensors. To configure Exchange Web Services Basic Authentication goto Step 6.
2. To Configure Exchange Web Services virtual directory OAuth Authentication using Azure Active Directory goto Step 7.
Step 3: Enable Enforcement in Cloud Email Protection
- In Cloud Email Protection, go to Manage > Organization.
- Click the organization name.
- In the Enforcement Settings section, move the Enforcement switch to Enable.
- Click Save.